Deanna Stover's Courses

Deanna Stover is an Assistant Professor at Christopher Newport University. This website is a compilation of her syllabi since starting at CNU in Fall 2020.
Github/Jekyll Blog Tutorial
What even is GitHub/Jekyll?
GitHub is a code hosting platform for versioning (meaning keeping track of changes in code) and collaboration. But that’s not what we’ll be using it for. We’ll be using Jekyll to create a static blog with no need for a hosting service, so it is free!
You’ll be using something called Markdown to write your posts. It’s really quite simple! It’s not coding per se, but it does convert your styling to HTML for display on your website. It takes a little patience to learn the ins and outs of Markdown, but by the end of the semester, it will be second nature!
Before you begin . . .
. . . you will need a GitHub account. If you don’t have one yet, sign up here. Remember, when you’re choosing your GitHub username, keep in mind FERPA (see the statement on the syllabus) and keep it professional and appropriate. Also, keep the name as simple as you can.
Creating your site
GitHub uses repositories to organize projects. You’ll be creating one repository for your project, since this will be a blog. There’s a lot you can do with the repository features in GitHub, but we’ll be keeping things pretty simple.
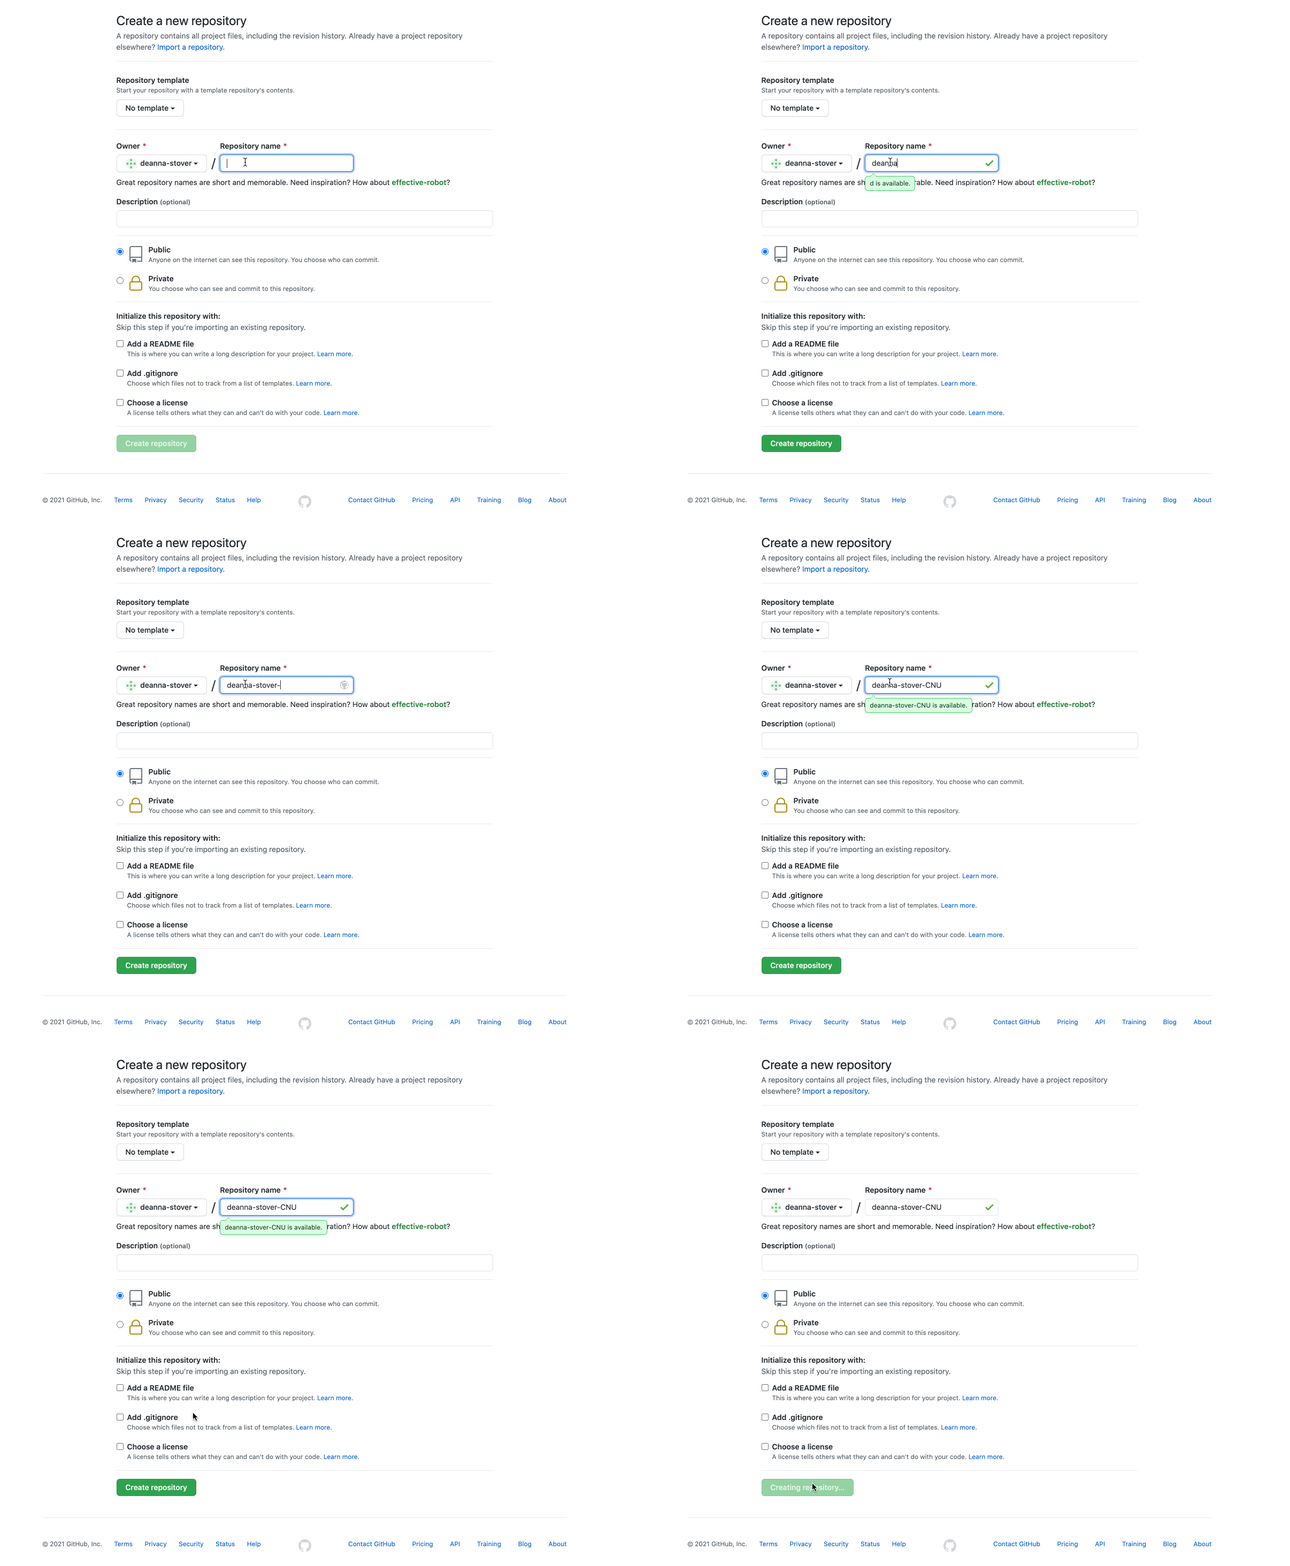
Go to https://github.com/new to make your blog repository. Simply type in your repository name under “Repository Name.” Again, remember FERPA when choosing your name and keep it professional, appropriate, and simple. It can even be the same name as your GitHub username!
Note that you don’t want to title the repository “About Me” or anything like that since we’ll be writing several blogs over the course of the semester within this same repository. To be clear, all of your blog posts will be hosted within this single repository, so choose the name wisely.
Make sure your blog is public so that we can all see it.
Adding initial (and ESSENTIAL) content
Creating _config.yml file
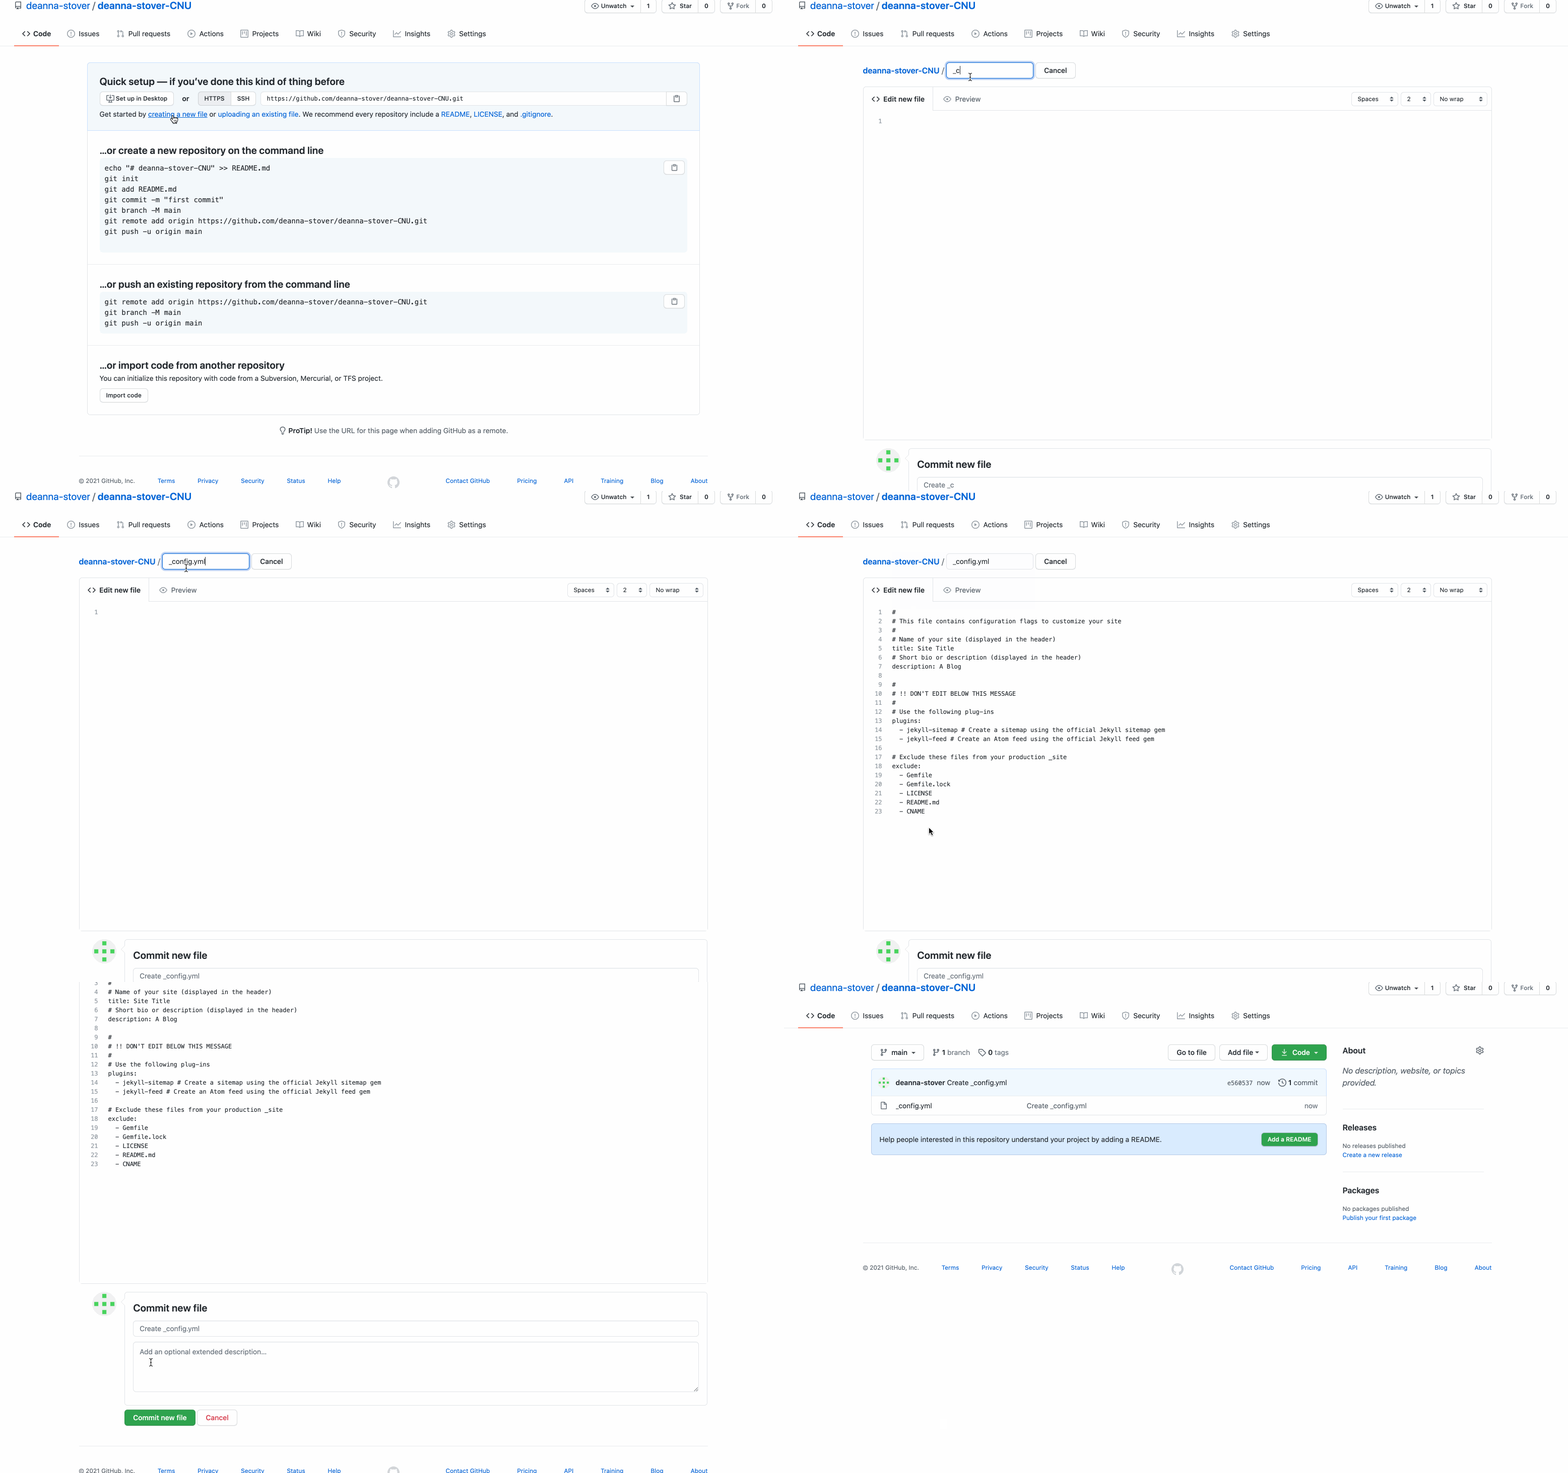
To create your first file, go to your repository (this is the page you should be on if you just created your repository).
Under the heading “Quick setup — if you’ve done this kind of thing before,” there is a link called for “creating a new file”. Click on that.
On the resulting page, in the box captioned “Name your file,” type _config.yml (make sure to include the underscore at the start of the filename).
Copy and paste the following code block into the file editor (to the right of the number 1 and below “Edit new file”).
#
# This file contains configuration flags to customize your site
#
# Name of your site (displayed in the header)
title: Site Title
# Short bio or description (displayed in the header)
description: A Blog

#
# !! DON'T EDIT BELOW THIS MESSAGE
#
# Use the following plug-ins
plugins:
  - jekyll-sitemap # Create a sitemap using the official Jekyll sitemap gem
  - jekyll-feed # Create an Atom feed using the official Jekyll feed gem

# Exclude these files from your production _site
exclude:
  - Gemfile
  - Gemfile.lock
  - LICENSE
  - README.md
  - CNAME
In the editor, where the file says title: Site Title, you can change “Site Title” to whatever you want your blog to be called. You can also edit description: A Blog to better describe your site. YAML is the file format used to configure your blog. (Note that I forgot to change the Site Title and Description in the GIF below, but you can always go back in and do this by clicking on _config.yml and then clicking the pen in the upper right hand corner–this allows you to edit any file you have committed. Check out more detailed instructions for how to do this below under “Site Title.”)
When you are done editing your file, scroll to the bottom of the page and click “Commit new file” to save your changes. “Commiting” is the fancy GitHub lingo for saving files to your repository (or repo).
Creating index.html file
Having created our first file, we need to create one more before we can start blogging. It’s going to be called index.html. You can think of it as the front page of your new blog.
If you have learned HTML, the code we are copying may look a little strange. Jekyll, the blogging software used by GitHub Pages, uses some special code to turn our posts into HTML.
If you haven’t learned HTML yet, this all will probably look like a foreign language. But that’s ok, we’ll talk more about what all this does.
So on your repo, click on the “Add file” menu and select “Create new file” from the drop-down menu.
In the “Name your file” box, type “index.html”. In the file editor, paste the following code block:
---
layout: default
---
<div class="posts">
  {% for post in site.posts %}
    <article class="post">

      <h1><a href="{{ site.baseurl }}{{ post.url }}">{{ post.title }}</a></h1>

      <div class="entry">
        {{ post.excerpt }}
      </div>

      <a href="{{ site.baseurl }}{{ post.url }}" class="read-more">Read More</a>
    </article>
  {% endfor %}
</div>
Scroll to the bottom and click “Commit New File” to commit index.html to your repo.

Getting your blog up and running
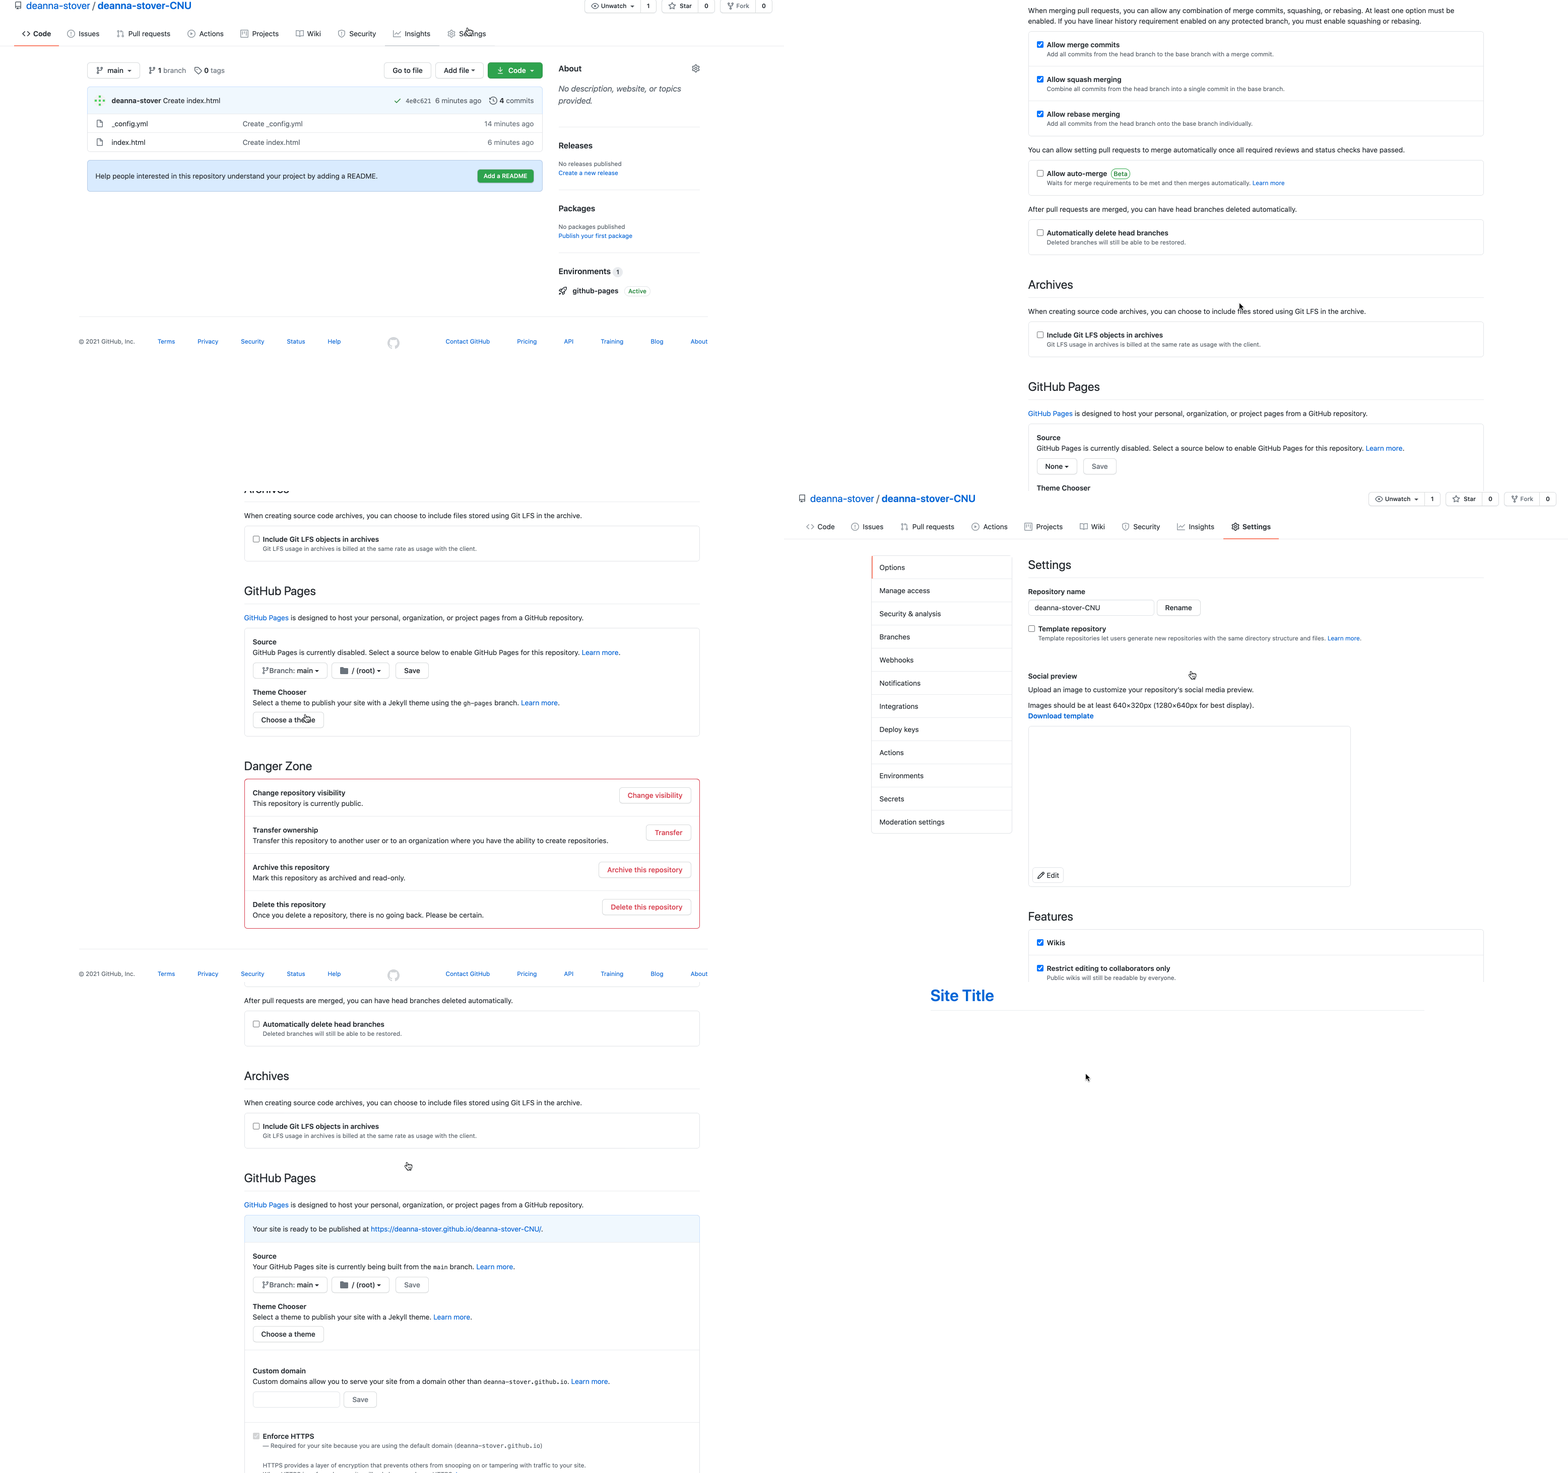
In order to start sharing our blog on the Internet, we need to make sure GitHub Pages Works.
On your repo page, click on the “Settings” tab. Scroll to the “GitHub Pages” heading.
If you don’t see a link there, you’ll likely see what I saw: “GitHub Pages is currently disabled.” We need to remedy this. Do so by clicking on the button that says “None,” and then choose “Main” then “Save.” Your blog link should show up at that point (but note that it might take a minute or so–GitHub can be slow!)
Customizing your blog
Site Title
To change “Site Title” as the name of your site, we will need to edit the _config.yml file we created earlier. This file is called the site’s configuration: it contains metadata about the site that tells GitHub Pages how to display and configure our site.
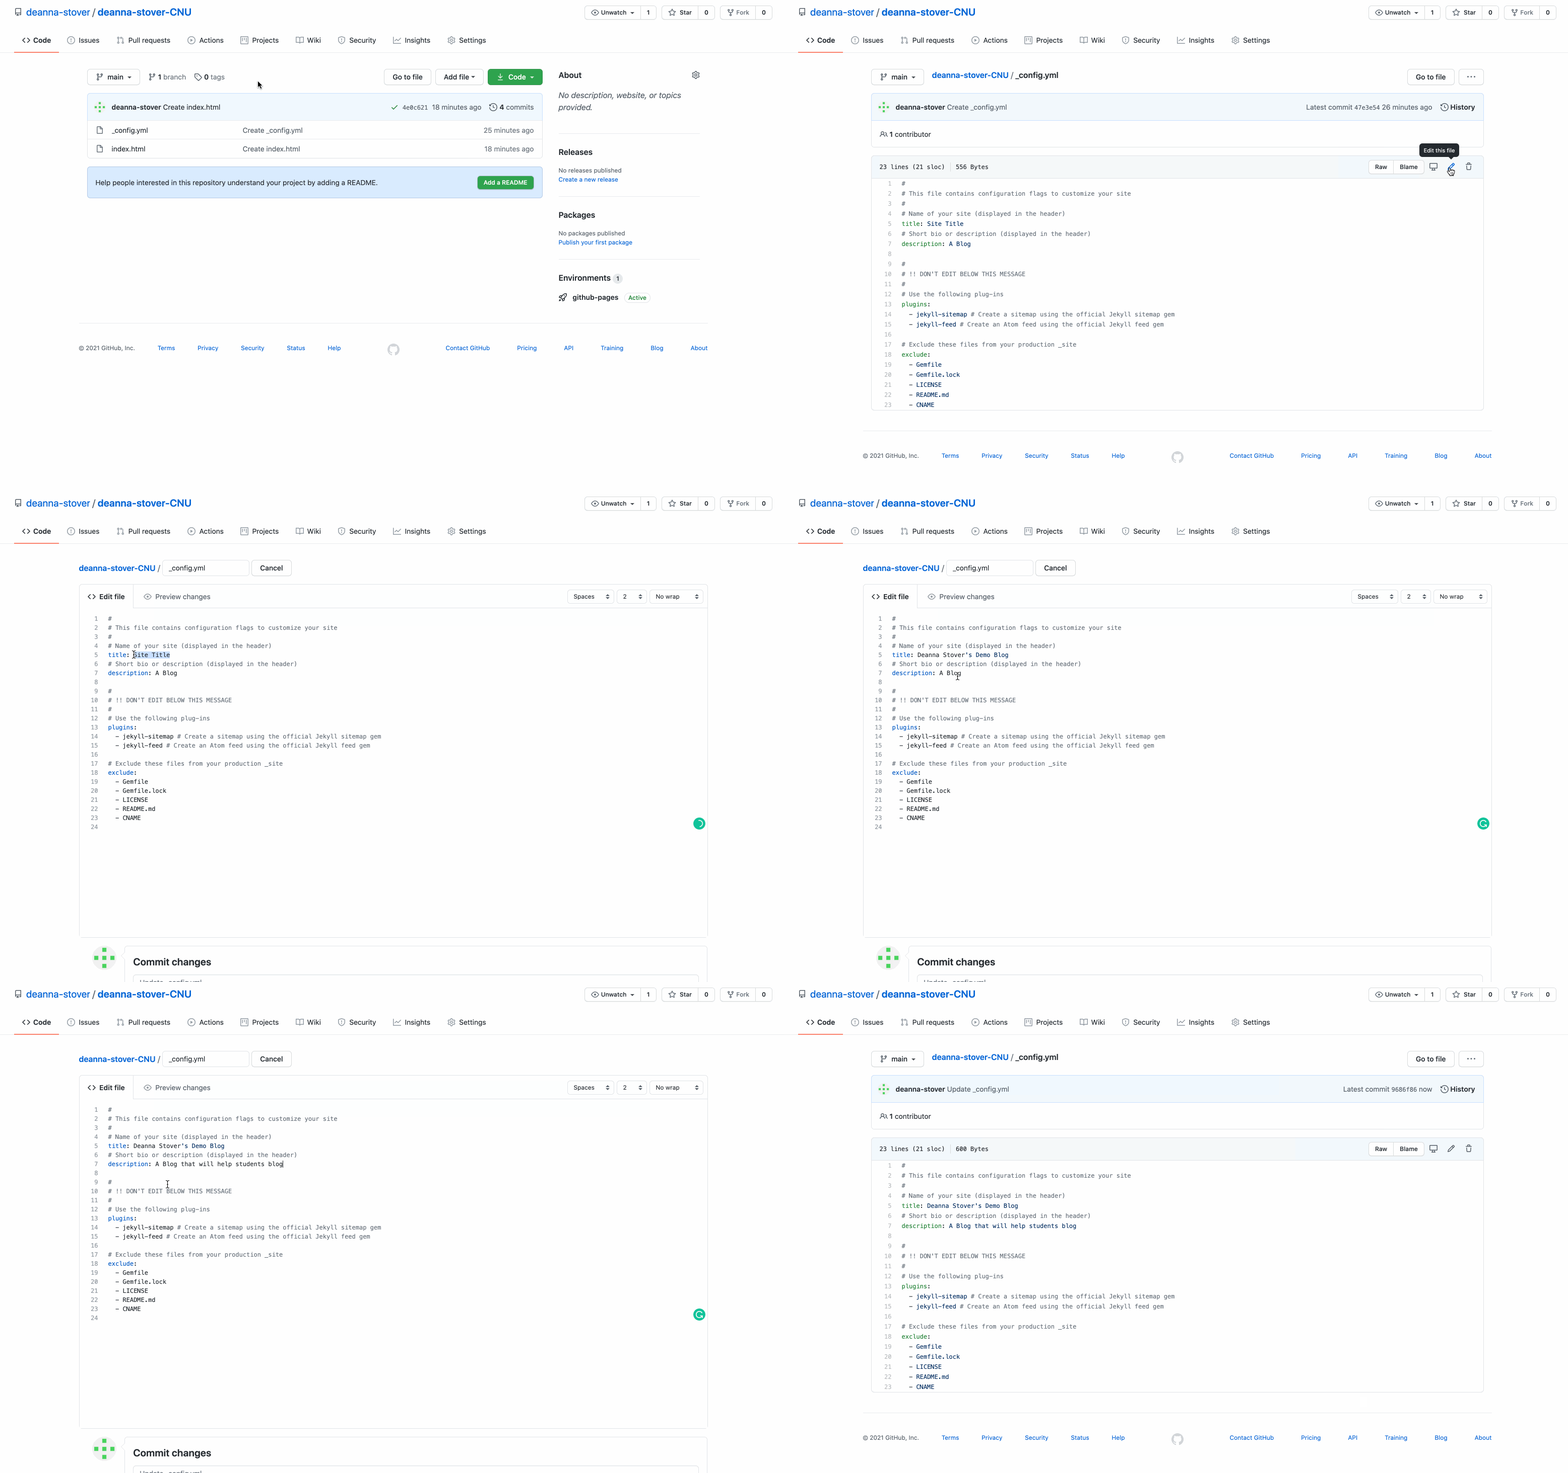
To edit your file, go back to the repo main page. Click on _config.yml in the list of files.
When the page showing the contents of _config.yml loads, look for a small pencil icon on the right side of the page. It will be to the right of buttons for “Raw” and “Blame”. Clicking this pencil will let you edit the file. Click it now.
We are back in the same editor we used to create the file.
Looking at the file, you should see a line that begins with title:. This line controls the setting for our site’s title. We can change what comes after the colon (:) to change our site’s title. Set your title to whatever you want.
You can also change the contents of the line that begins description: to give your site a more accurate description.
When you are happy with your site’s title and description, click the button labelled “Commit changes”.
Now go back to settings and “GitHub Pages.” Click that link. You should see your new title. But if you don’t, be patient. GitHub takes a bit to get everything working. Try again in a minute or so. If it still isn’t working then, contact me with a link to your repository.
Changing the theme
If you want your blog to be a little more interesting, go ahead and change the theme! I certainly appreciate it so that I get some variety.
First, go to “Settings,” then under “GitHub Pages” (where you find your link!) you should see something that says “Change Theme.” Click it and try out a few options! You can always change it again.
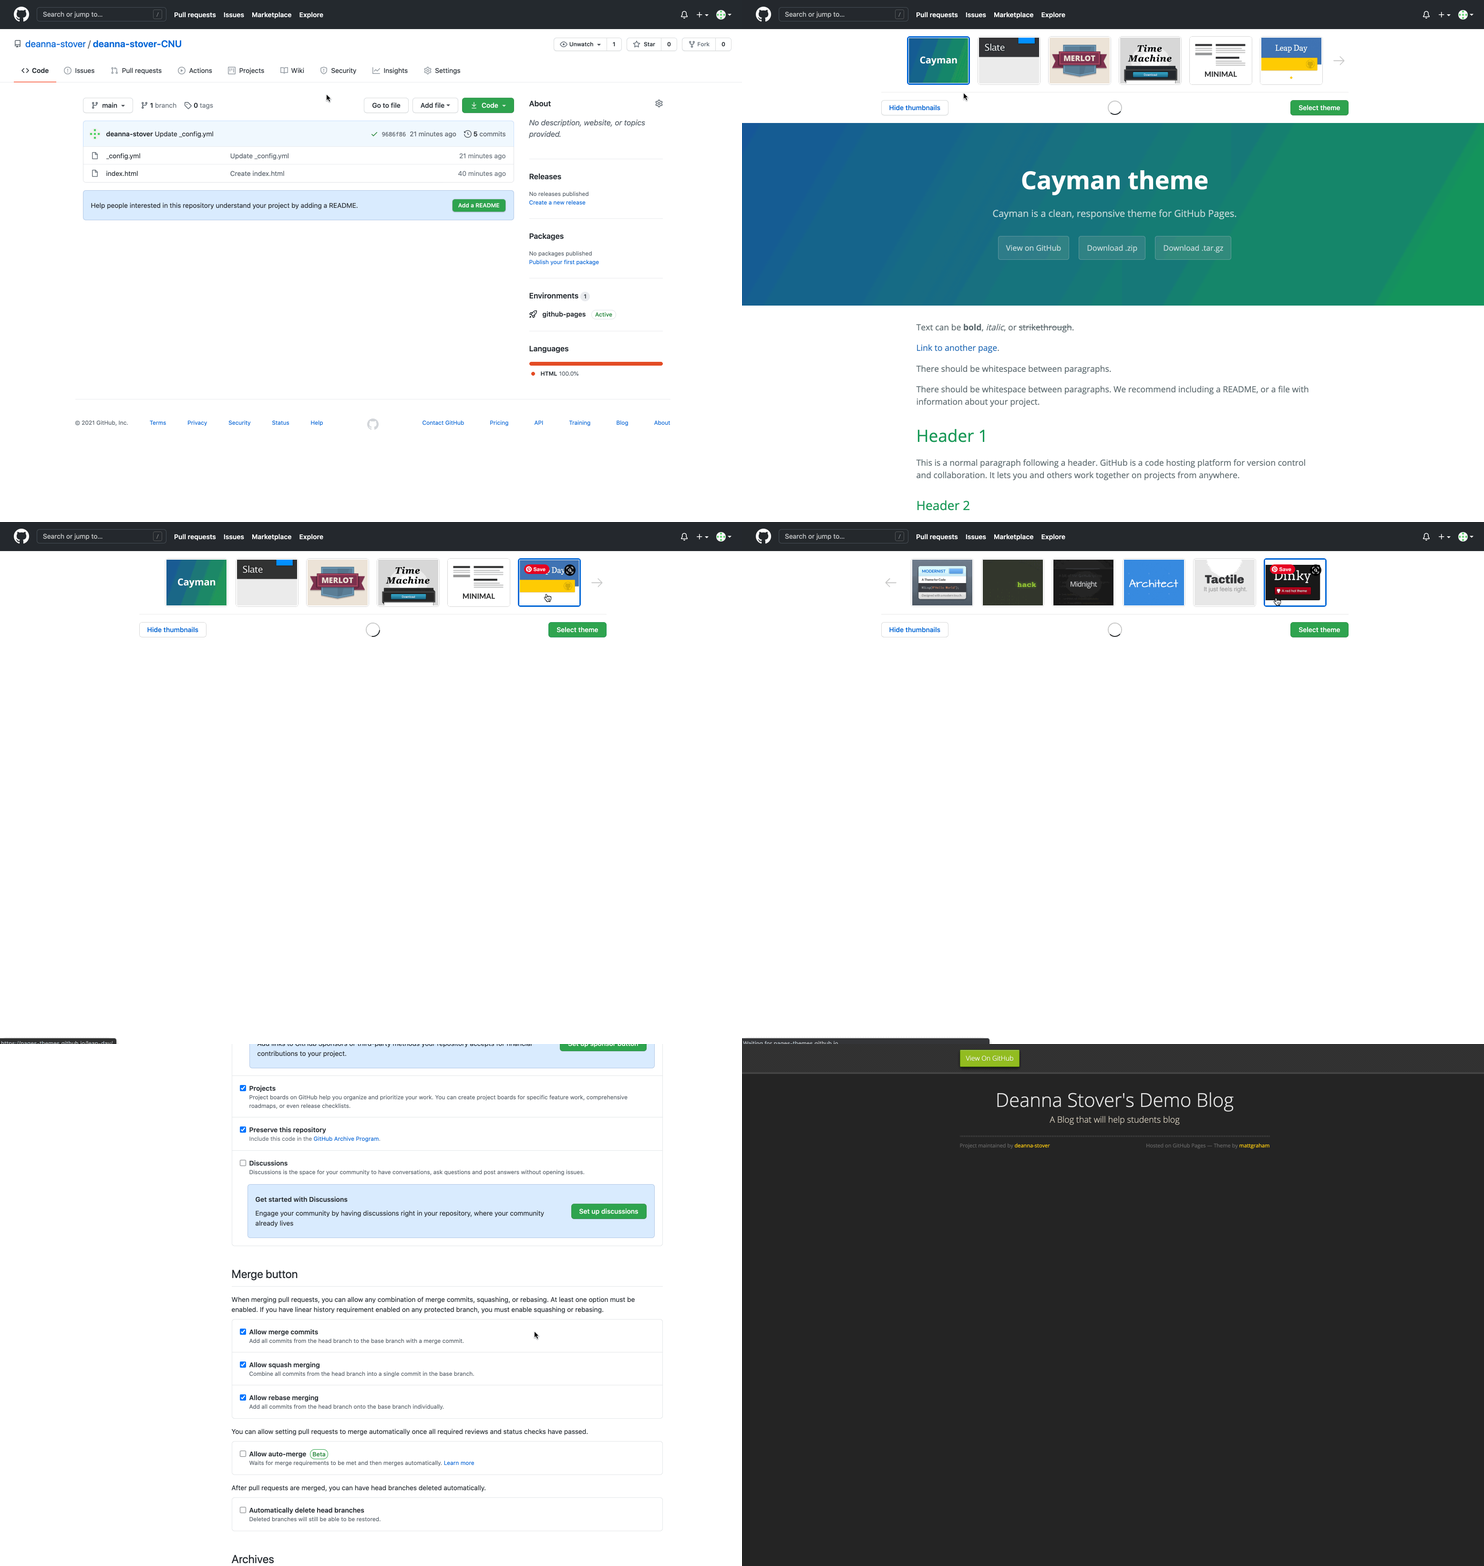
Again, this may take up to a minute to show up. I cut the gif so that it wouldn’t take as long, but it took nearly a full minute for my new theme to show.
Your first blog post (the About Me post!)
Once again, we will need to create a file in our repository. This time, we will also be creating a folder!
Blog posts live in a special folder called _posts in our repo. Additionally, posts have a special file name structure, which is YYYY-MM-DD-title.md.
Here YYYY would be the present year as a four digit number (2021 for me), MM would be today’s month as a two digit number (01 for me; you have to use a 0 for the first digit when the month is less than 10), DD is today’s day of the month as a two digit number (04 for me, again you have to use a 0 for the first digit if less than 10) and title is anything you want, but is usually what is called a “slug,” a representation of the post’s title using only letters, numbers, and the dash (-) character.
So, to make our post, once again click on the “Add File” menu on your repo’s main page and select “Create new file”.
On the new file page, type _posts/2021-01-04-about-me.md using whatever today’s date actually is for you. You should title your first post “About Me” because that’s what your first post will be!
You’ll note that when you type the / character it adds _posts/ after the name of your repo and removes it from the text box. That’s just GitHub’s way of acknowledging it knows you are creating a folder. Later, when you add more posts, you’ll go into this folder and simply Create a New File from there, with the same YYYY-MM-DD-title.md structure, but without having to write _posts/. To be clear, all of your posts for this class will live in the _posts folder.
Now that you’ve created your first MD (or Markdown) file, you’ll be able to start writing. Remember to follow the Markdown Tutorial for more information on how to write Markdown to style your posts (this is how you add headers, italics, bold, images, links, etc.). The instructions for how to add images are included in the blog prompt.
You can see one example of Markdown in the GIF below. We’ll go over sample About Me posts in class, so don’t use the actual text as an example.
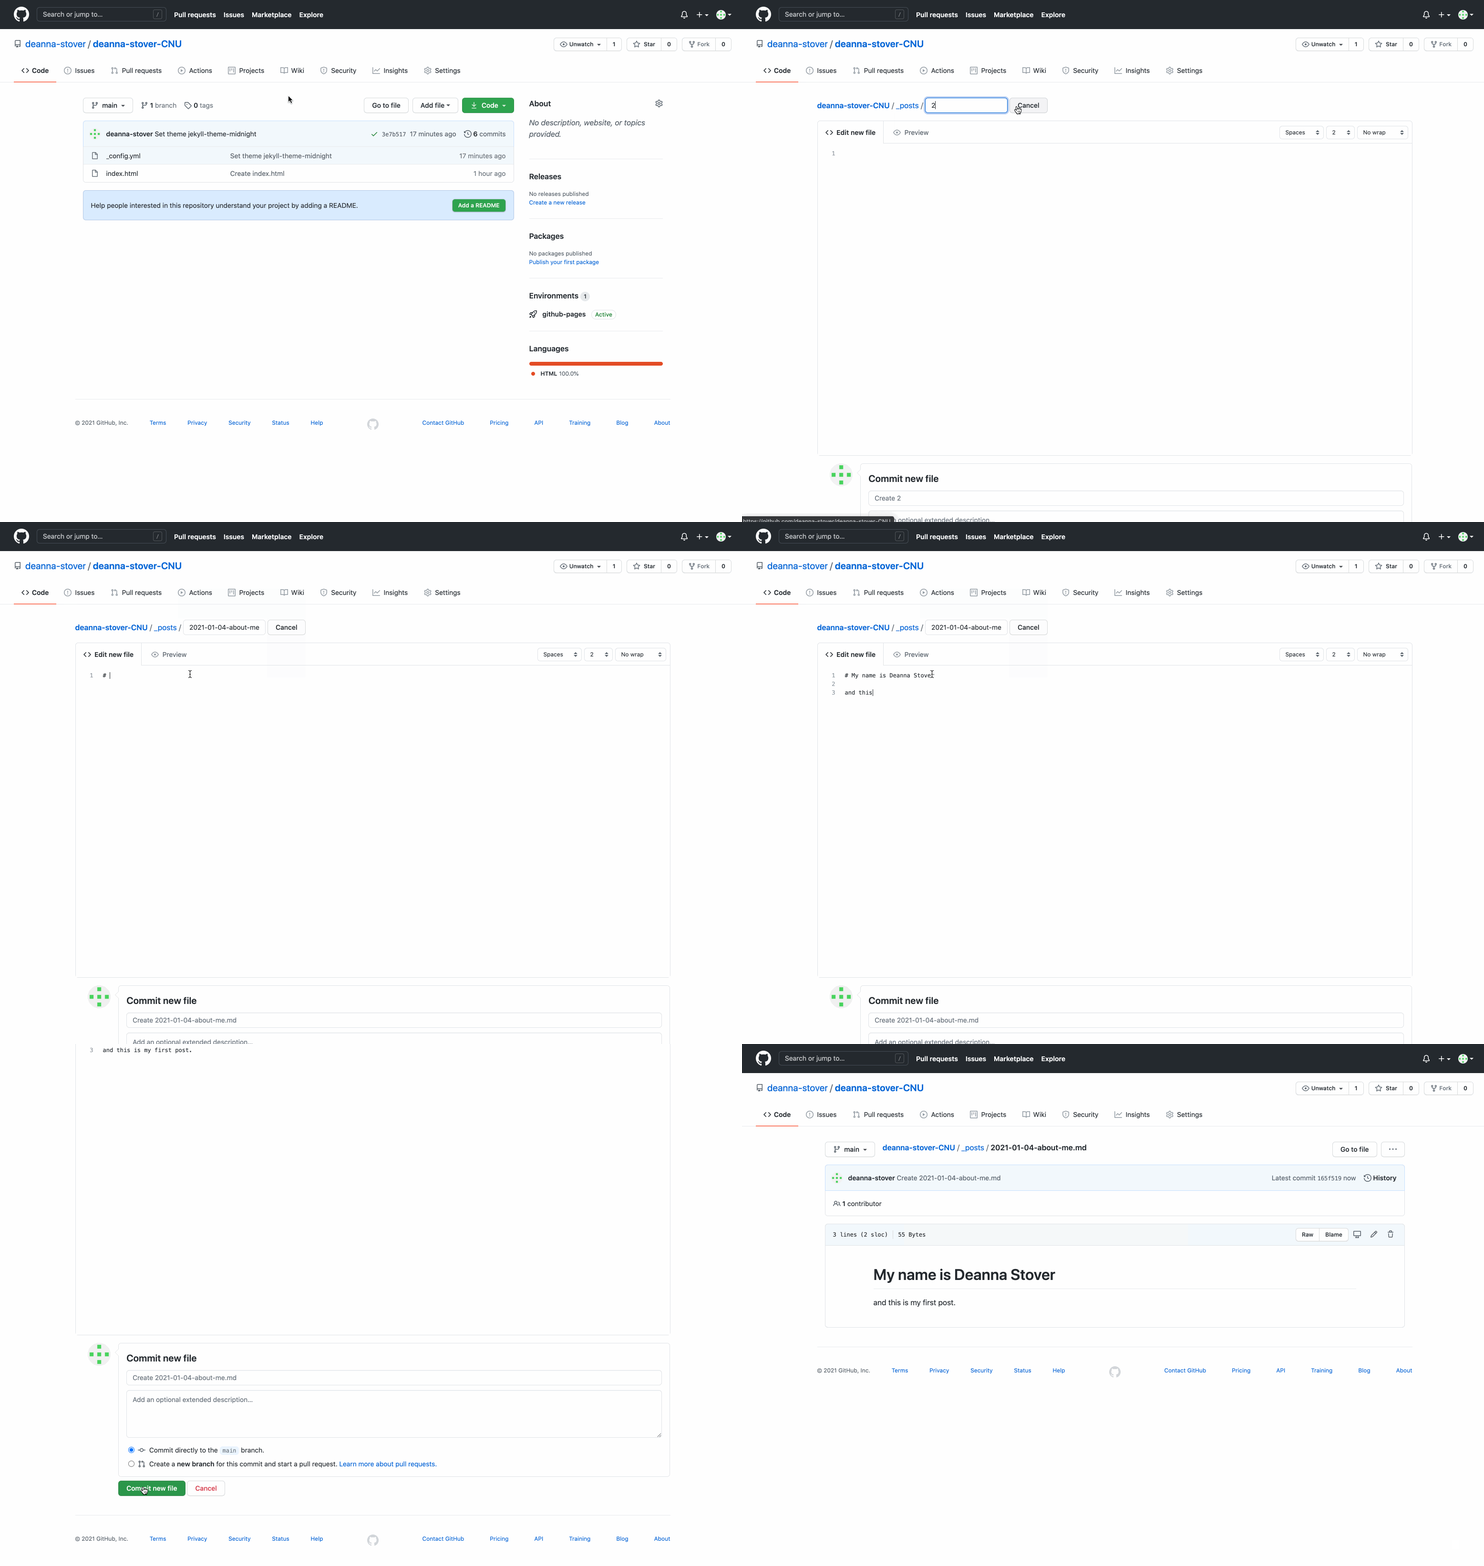
Once you wait for the site to rebuild, again, you should be able to reload your site and see your first blog post!
That’s it! You should now have a functioning blog built on GitHub Pages and Jekyll.
I owe a lot of credit to (and much language from) Dr. Andrew Pilsch’s own tutorial on GitHub/Jekyll.