Deanna Stover's Courses

Deanna Stover is an Assistant Professor at Christopher Newport University. This website is a compilation of her syllabi since starting at CNU in Fall 2020.
Research Blog Prompt(s)
About Me Blog:
Blog Post Due: Sunday, September 5th at 11:59 pm
Percentage: 10%
Review One Blog:
Peer Review: Wednesday, September 15th (in class)
Blog Post Due: Sunday, September 19th at 11:59 pm
Percentage: 10%
CNU Blog:
Peer Review: Wednesday, September 29th (in class)
Blog Post Due: Sunday, October 3rd at 11:59 pm
Percentage: 10%
Review Two Blog:
Peer Review: Wednesday, October 20th (in class)
Blog Post Due: Sunday, October 24th at 11:59 pm
Percentage: 10%
Reflection Blog:
Blog Post Due: Friday, December 10th between 8:00 and 10:30 am (Finals Week)
Percentage: 10%
Total Percentage: 50%
General Overview
You will write five research blog posts over the course of the semester using GitHub/Jekyll. To get started, make sure you complete my tutorial.
We’ll be doing several different kinds of posts on the blog, the details for which are below, but keep in mind that this is a research blog, so keep your tone professional (rather than informal) throughout. (That doesn’t mean you can’t have fun–just be aware of the context and audience.)
Check out “How to Submit” to figure out how to turn in your assignment to Scholar.
About Me
You will write 400-600 words describing your academic self (with enough about the personal that makes you feel comfortable, keeping in mind the FERPA notice on the syllabus). If you go over the word limit, that’s fine! But try and be concise.
You should include at least one image and at least five other instances of markdown to format your posts, whether that’s inserting links or simply emphasizing words.
Some ideas to get you started, but you can write anything as long as it is appropriate:
- Your year in school
- Your pronouns
- Your interest in the course
- Your interest/enrollment in the DH minor
- Pursuing a carreer in writing
- Fulfilling a WI requirement . . . and (hopefully!) wanting to become a better writer
- Carreer interests (writing or otherwise)
- Do you want to go to graduate school? Or enter a career right after graduation? What are your dreams?
- Academic or personal successes
- Have you volunteered anywhere?
- Have you been a Summer Scholar? An intern? Etc.
- Do you belong to any societies? Academic or otherwise . . .
- Some personal tidbits
- Hometown
- Pets
- Fandoms you belong to
Regarding the image, feel free to add a picture of yourself, although it’s not required (again, see the information about FERPA on the syllabus). However, you must use some sort of image if you don’t want to include an image of yourself. It could be a pet, for instance.
To insert a picture, simply do the following:
Step One:
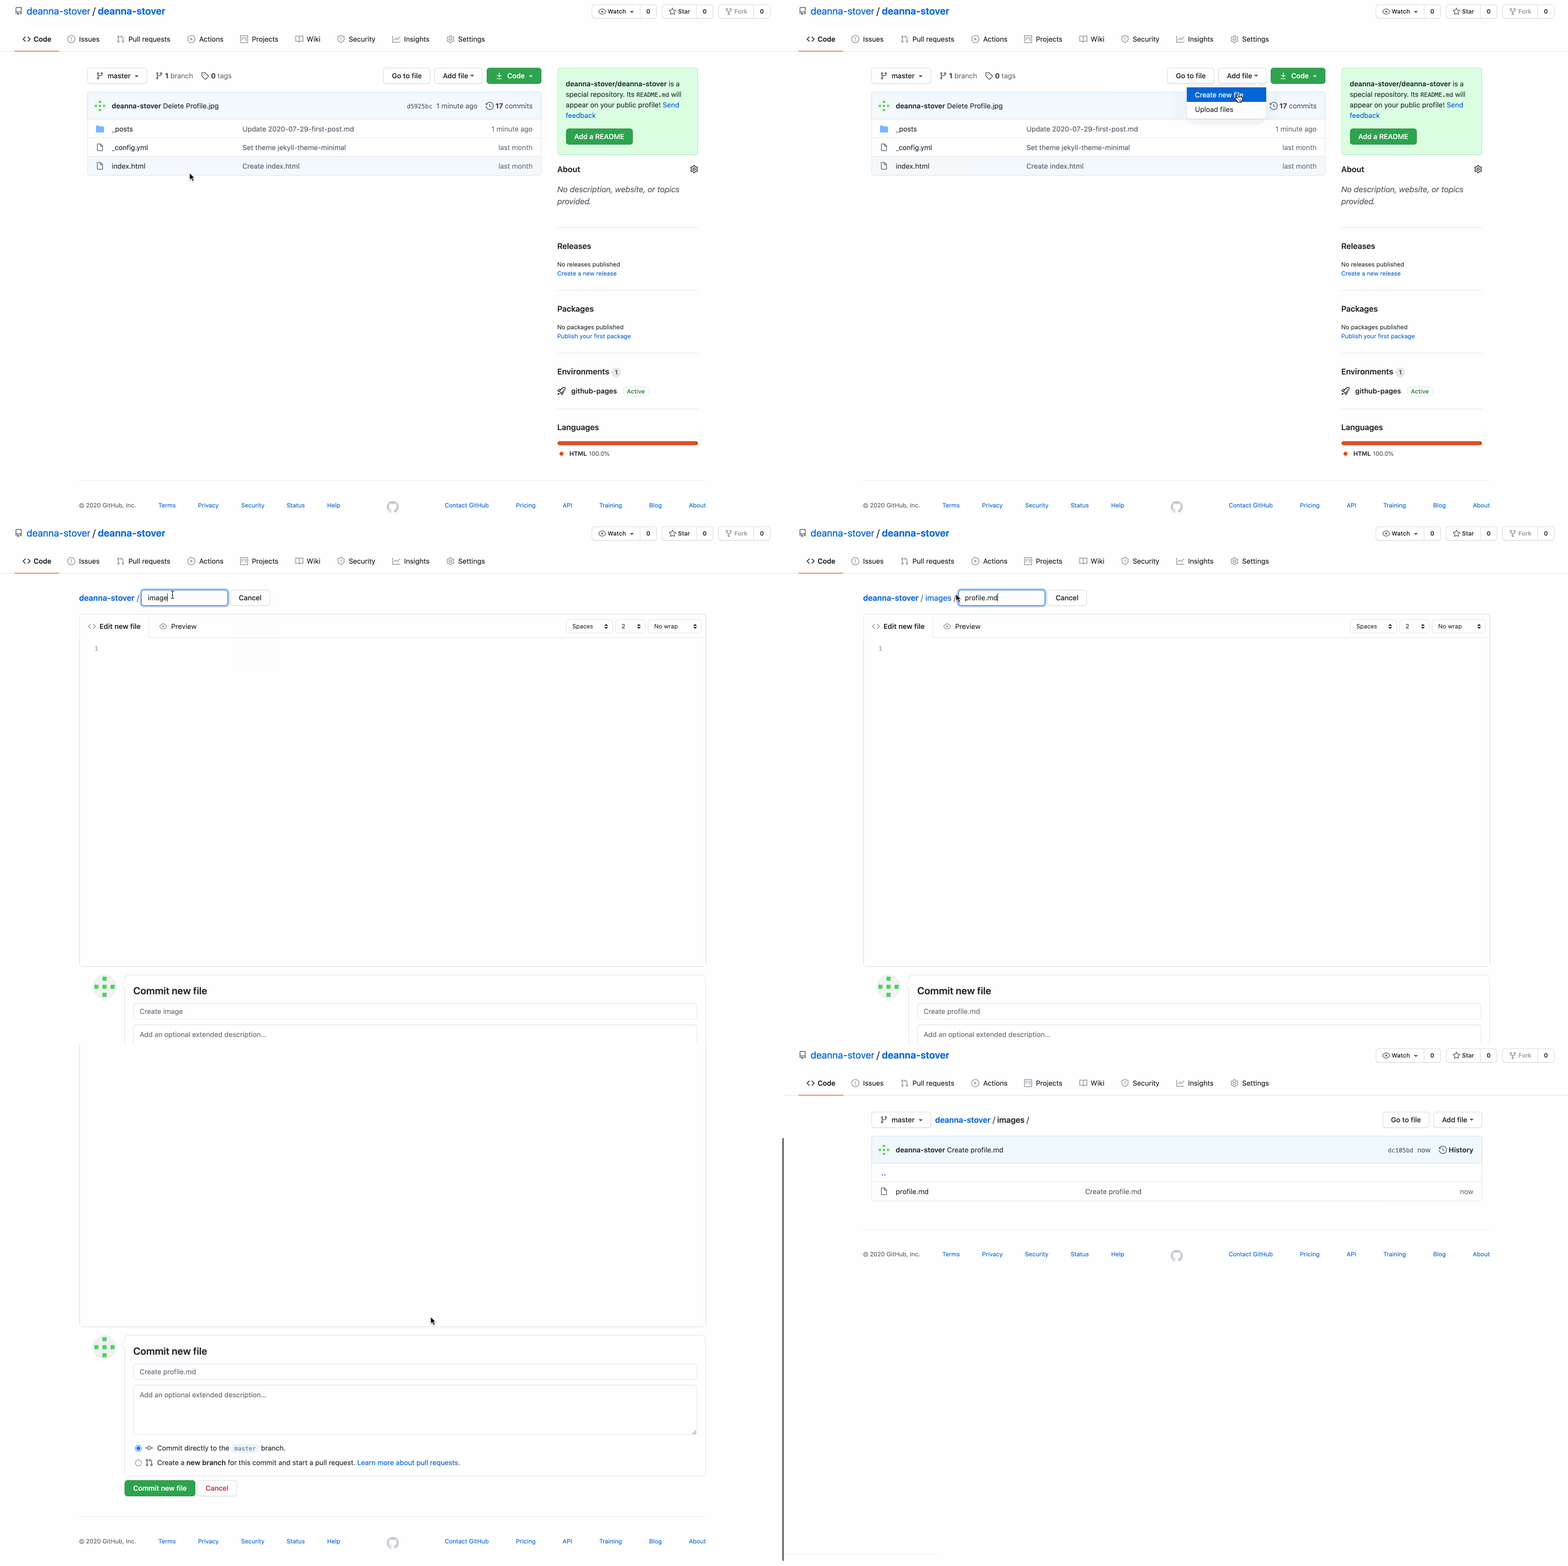
The first thing you need to do is create an images folder. You do this by going to Add File then Create New File. You will then type in images/profile.md (or whatever–the important part is the images/. You can delete the .md file later. It’s just there so that you have a folder.) Don’t forget to Commit your changes.

Step Two:
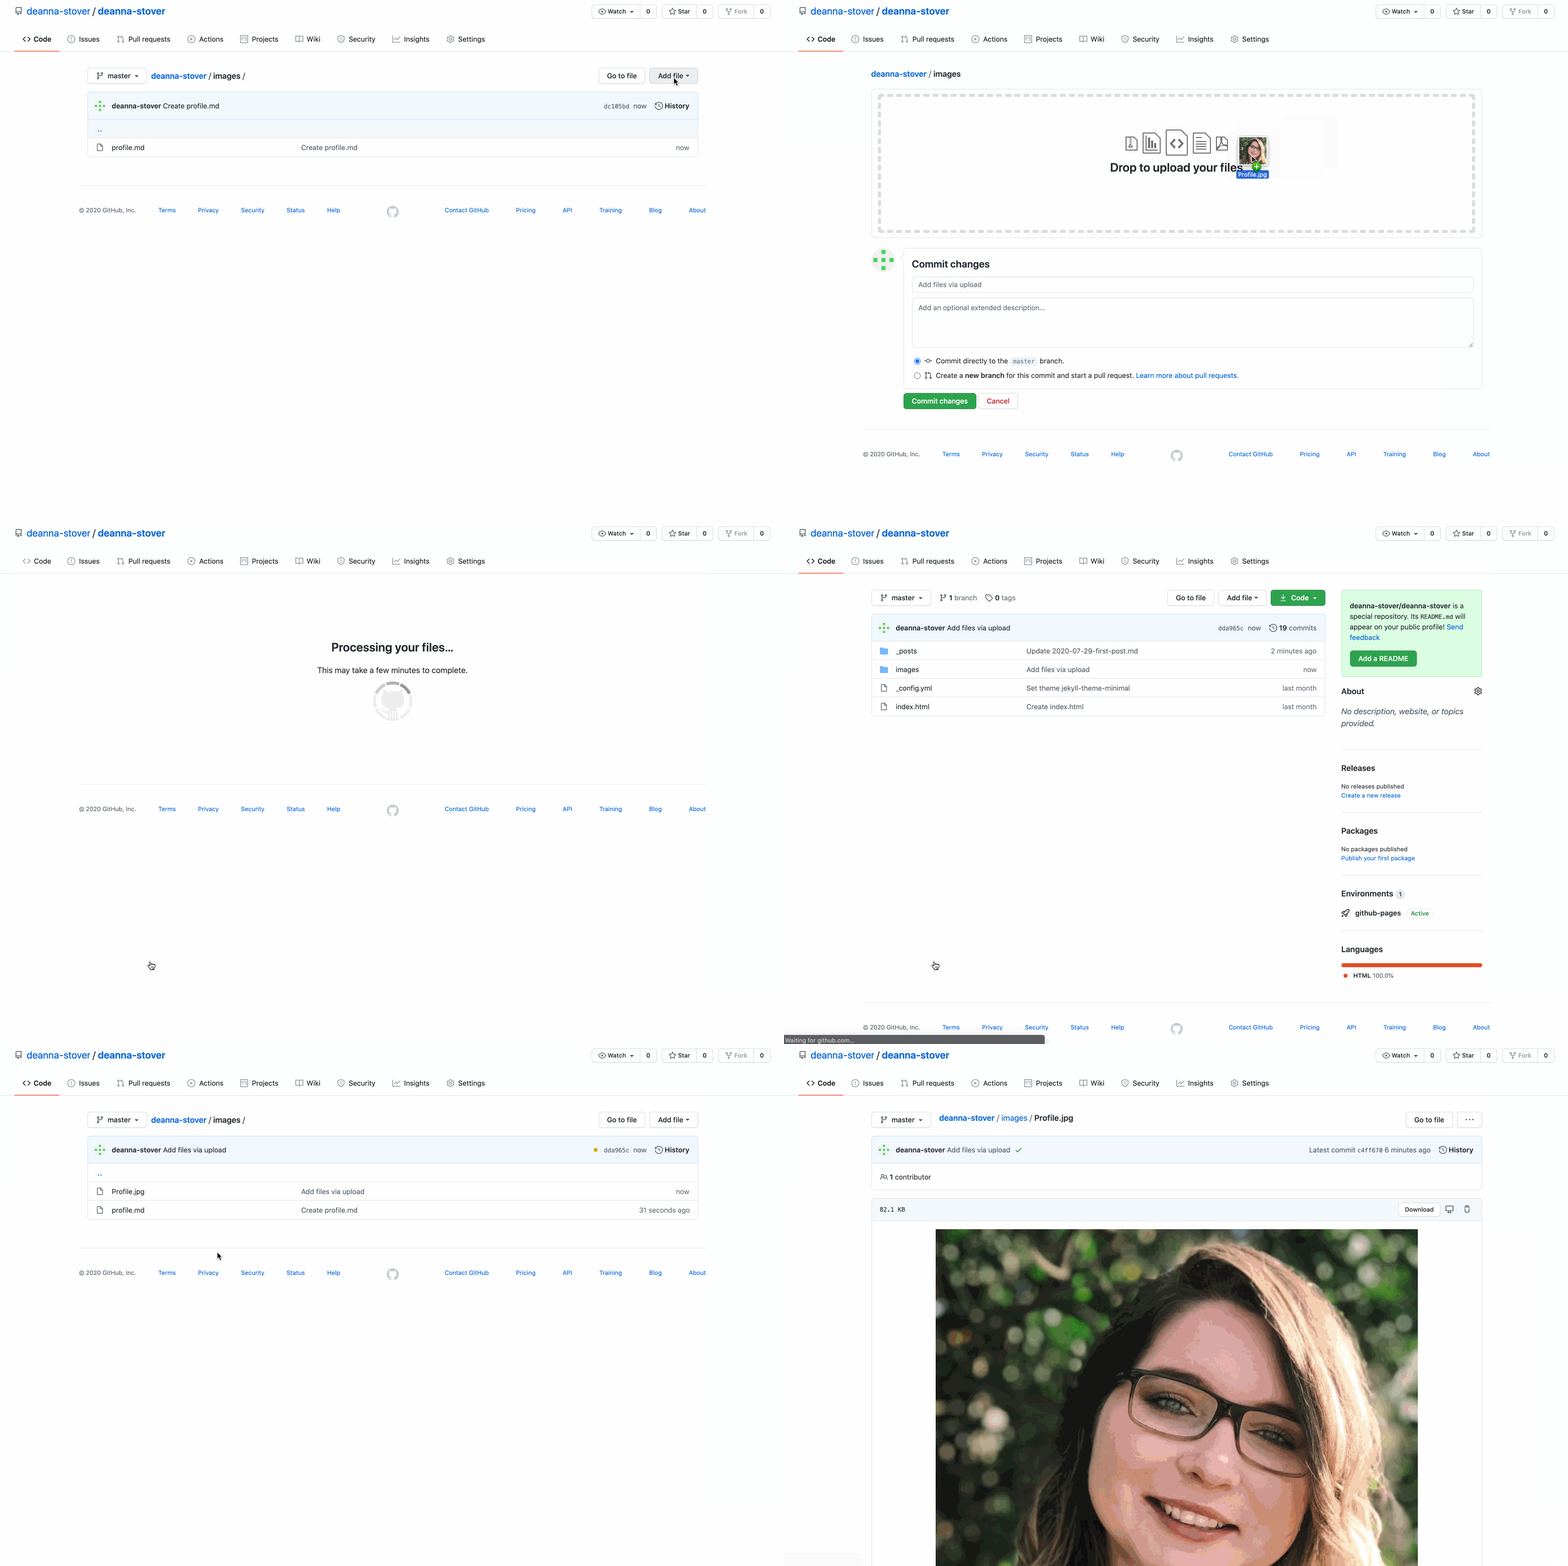
Once you’ve created the folder, make sure you’re in the images folder the click Add File then Upload Files. You can then drag and drop your picture into GitHub. Don’t forget to Commit.
Tips:
- You want to name your photo rather than leave it a string of letters or numbers. The title will be the link you use. I chose “Profile.jpg” because it is my profile picture.
- Make sure your image is smaller than my gigantic one, but good quality.

Step Three:
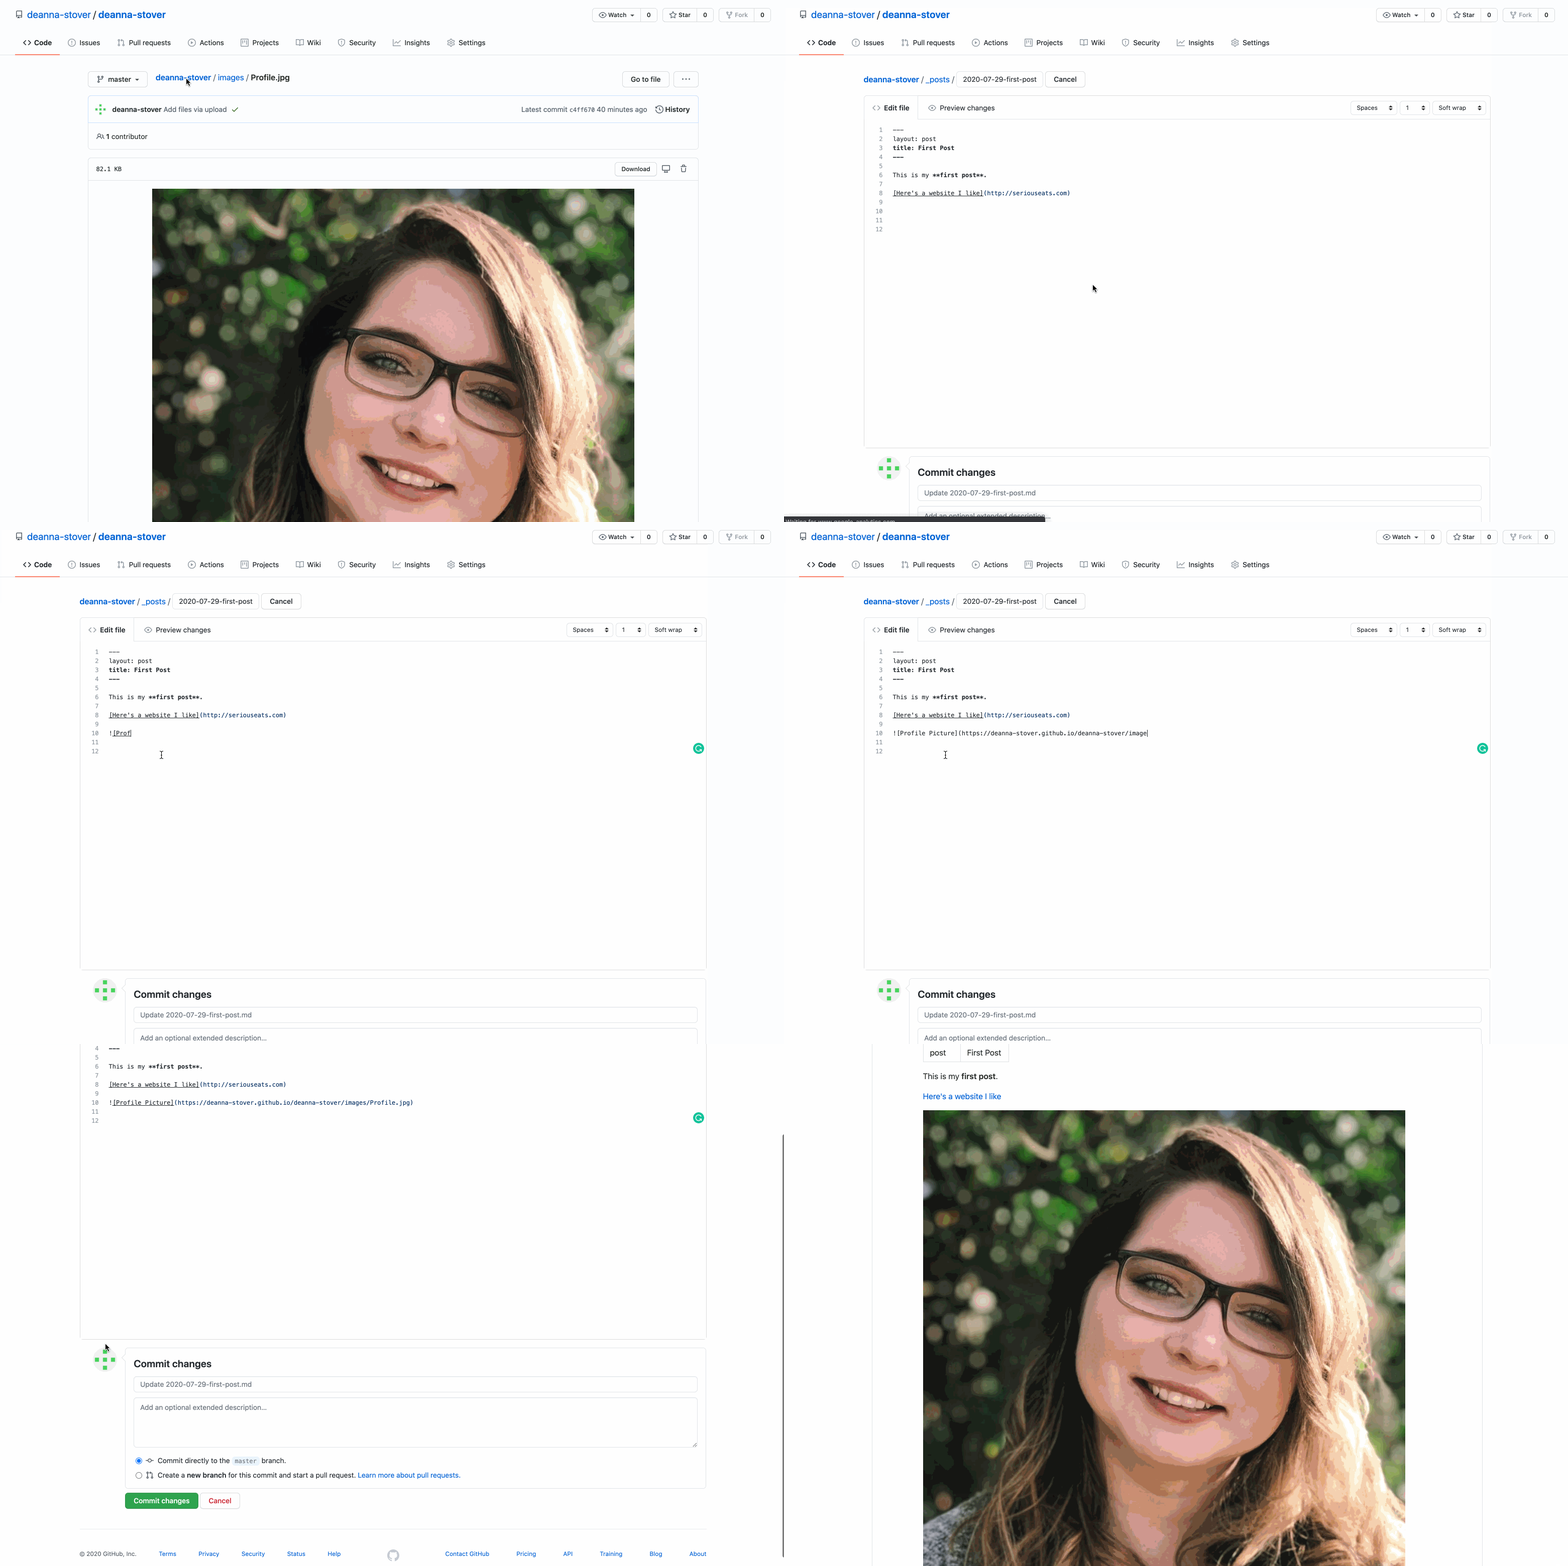
To add your image into your blog, first go to your _posts folder then to the appropriate post. Once you click the edit button (the pencil), you can type  (filling in the blanks as appropriate. Your link should be the path to the image. So username.github.io/repositoryname/images/imagetitle.filetype. Don’t forget to commit.

And remember, always check to see if the image is showing up on your actual blog, not just the preview in GitHub. If it’s not, you’re using the wrong link (tip: if your link has “blob” or “github.com” in it, you’re using the wrong link. Instead, you need to use the path that looks something like this: https://deanna-stover.github.io/deanna-stover/images/Profile.jpg).
Review One
Based on the reviews you read in preparation, write a review of a digital humanities project from the list I have provided on the Google Drive. You must claim a project by putting your name next to one of the options so that not everyone in class reviews the same project. Do this by class on Monday, September 6th. Make sure to pick something that other people have not yet claimed.
This blog should be 600-750 words. Remember that you can be critical and still polite or appreciative but still evaluative.
Include at least two images of the project you’re reviewing. But if your project is extra complex, remember, you may need more.
Tip: Check out the “Review Content” section from Reviews in DH to get some more ideas for what a review entails. And do pay attention in class–we’ll go over more tips and tricks!
Make sure you use the following format for introducing your blog post:
Project:
Project Name
Project Director(s):
Project Director Name
Project URL:
Project URL
CNU
In this blog, you’ll write 400-600 words about the CNU storytelling map assignment and embed your ThingLink into the post so that your peers can see what you created!
To embed your ThingLink in GitHub pages, just go to “Share” in the upper right-hand corner of your screen, copy that Embed Code and then paste it in the appropriate place in your post. Note that it won’t show up in Preview, but it will show up on your blog (but double check this just in case!).
As for the content of the blog itself, this is all about explaining and reflecting on both the story you are trying to tell with your interactive map and the process of creating it. I recommend doing it in this order; so, again, explain what your map is about/the story it tells and then reflect on the process of making it. Was the interface easy to use or difficult? Did you struggle with any part of the assignment, such as thinking of a story to tell or coming up with the media required? How did you overcome these struggles? Do you feel more or less connected with the university now? These are just some questions to get you started on the process of creating the map, but this list is certainly not exhaustive. Essentially, think critically about what you’re trying to portray and the experience of making a digital object.
Review Two
You will write another 600-750 word review, but this time it will be on a project that you have found. Please “claim” your project on the Google Drive by Friday, October 8th. Please do not review a project that has already been reviewed in Reviews in DH. You also cannot choose a project from the Review One list I provided or a project covered in one of the sample reviews we read.
Some general guidelines: you must find and review a digital humanities project, not just an article or book on DH (even if those things are online!). You also want to think about the scale of the project; medium-sized projects are actually easier to review. Too small and you won’t have enough to say; too big and you’ll get overwhelmed. You might find a mapping project or a digital edition or really anything that qualifies as DH. A big tip? Look for something interactive in some way. If you’re having trouble finding something or telling whether what you’ve found qualifies as DH, bring your issue up in class or visit me during Office Hours (well before the deadline, of course).
Include at least two images of the project you’re reviewing. But if your project is extra complex, remember, you may need more.
Tip: Check out the “Review Content” section from Reviews in DH to get some more ideas for what a review entails. Pay attention in class–we’ll go over more tips and tricks. And, of course, keep in mind my feedback on your last review post!
Make sure you use the following format for introducing your blog post:
Project:
Project Name
Project Director(s):
Project Director Name
Project URL:
Project URL
Reflection
In this 750-850 word blog, you’ll be reflecting on the class.
You need to have at least two images in your blog post. This can be one of your tweets, a mock-up from your grant, a project that inspired you from the course, or something else entirely!
A few questions to get you started thinking about the class as a whole:
- What does Digital Humanities mean to you now that you’ve taken this course? Did your definition change over time? Do you have a better understanding of the field?
- How did the readings supplement your understanding of course content (or not!)? Were any of them particularly helpful? Any worth skipping?
- What assignments did you enjoy and/or struggle with? Why? Were they helpful in better understanding DH and its many complexities? Why or why not?
- Do you think you’ve grown as a writer? As a reader? As a student? As a digital humanist?
Basically, think about the class as a whole. What has worked for you and what hasn’t?
Keep in mind the following:
-
Keep paragraphs short for easy reading!
-
Be professional.
-
Continue trying to be more concise while varying sentence length.
-
Organize your writing. You may do this chronologically or topic-based, for instance.
What you should NOT do
-
Please don’t mention your grades. It’s not necessary and it puts you in a vulnerable spot. Instead, you can talk about how an assignment was difficult for you or how much fun you had doing a certain project. No grades. It’s just not worth it and it puts both of us in a weird position.
-
Please don’t quote my feedback. That’s something personal between the two of us. You can, however, talk about how my feedback was helpful as you moved forward or how you felt that you needed more guidance at a particular point.
-
This isn’t a rant or a time to gloat. If you had problems with the class, you can discuss why, but save a lot of that for your reviews of me and the course. You can be critical of readings, of course, and you can discuss frustrations, but please don’t, well, rant. On the other hand, if you loved a particular assignment or the course as a whole, that’s great (really great!), but think critically about it too. What worked for you and what didn’t?
How to Submit
To find the URL for your blog, you’ll need to go to Settings on GitHub, scroll down to “GitHub Pages”, click the link, and then find your post. Once you’ve done that, simply copy and paste what is in the browser bar.
Your URL should start with something like this: https://deanna-stover.github.io/ NOT like this: https://github.com/deanna-stover/
Under “Assignments” on Scholar, please use the Text Submission “Write Submission” button to enter the URL to your blog and then upload a screenshot of your code. To capture all your code, just go into “Raw” or the edit file portion of GitHub. To do the latter, you will need to choose the “soft wrap” option in GitHub in order to see all of the text/markdown at once. This option is in the upper left hand corner of where you edit your file. I’ll be able to see all your writing and the code that way.
Peer Review: If you have a peer review assignment with any blog post, please upload the feedback you received along with your code. While there is no grade for peer review per se, I will take into account whether you participated in peer review when calculating your grade for the assignment.
Late Work
I will be subtracting 5 points for every day your assignment is late unless you’ve been been given an extension.
(General) Evaluation Criteria
-
Thinks critically whether you’re writing a review or a process post or just introducing yourself
-
Shows professionalism – i.e. that you took this assignment seriously – and pays attention to audience, meaning you found the balance between writing for the public and writing about yourself and your research. Your blog should not be too informal nor too technical.
-
Presents information in an organized, concise, and coherent way. Remember, part of being organized in digital writing is breaking up those paragraphs!
-
Follows instructions for the appropriate blog post and takes advantage of the platform (in other words, you use Markdown appropriately)
-
Utilizes proper mechanics; style, sentence structure, and spelling promote coherence, clarity, and credibility