Deanna Stover's Courses

Deanna Stover is an Assistant Professor at Christopher Newport University. This website is a compilation of her syllabi since starting at CNU in Fall 2020.
Blog Prompt(s)
About Me Blog:
Blog Post Due: Friday, September 11th by 11:59 pm
Percentage: 10%
Review Blog:
Peer Review: Wednesday, September 23rd (in class)
Blog Post Due: Friday, September 25th by 11:59 pm
Percentage: 10%
TEI (Coding) Blog:
Peer Review: Wednesday, October 14th (in class)
Blog Post Due: Friday, October 16th by 11:59 pm
Percentage: 10%
Grant Project Blog #1:
Blog Post Due: Friday, November 20th by 11:59 pm
Percentage: 10%
Grant Project Blog #2:
Blog Post Due: Friday, December 11th by 11:59 pm
Percentage: 10%
Total Percentage: 50%
General Overview
You will write five blogs over the course of the semester using Jekyll/GitHub. To get started, make sure you complete Dr. Andrew Pilsch’s tutorial.
We’ll be doing several different kinds of posts on the blog, the details for which are below. Check out “How to Submit” to figure out how to turn in your assignment to Scholar.
About Me
This is the shortest of your blog posts. You will write 250-500 words describing your academic self (with enough about the personal that makes you feel comfortable, keeping in mind the FERPA notice on the syllabus). If you go over the word limit, that’s fine! But try and be concise.
You should be using some markdown to format your posts, whether that’s inserting links and images or simply emphasizing words. Update: some students wanted more guidance, so please use at least five instances of markdown.
Some ideas to get you started, but you can write anything as long as it is appropriate:
- Your year in school
- Your preferred pronouns
- Your interest in the course
- Your interest/enrollment in the DH minor
- Pursuing a carreer in writing
- Fulfilling a WI requirement . . . and (hopefully!) wanting to become a better writer
- Carreer interests (writing or otherwise)
- Do you want to go to graduate school? Or enter a career right after graduation? What are your dreams?
- Academic or personal successes
- Have you volunteered anywhere?
- Have you been a Summer Scholar? An intern? Etc.
- Do you belong to any societies? Academic or otherwise . . .
- Some personal tidbits
- Hometown
- Pets
- Fandoms you belong to
Also, feel free to add a picture of yourself, although it’s not required (again, see the information about FERPA on the syllabus). To insert a picture, simply do the following:
Step One:
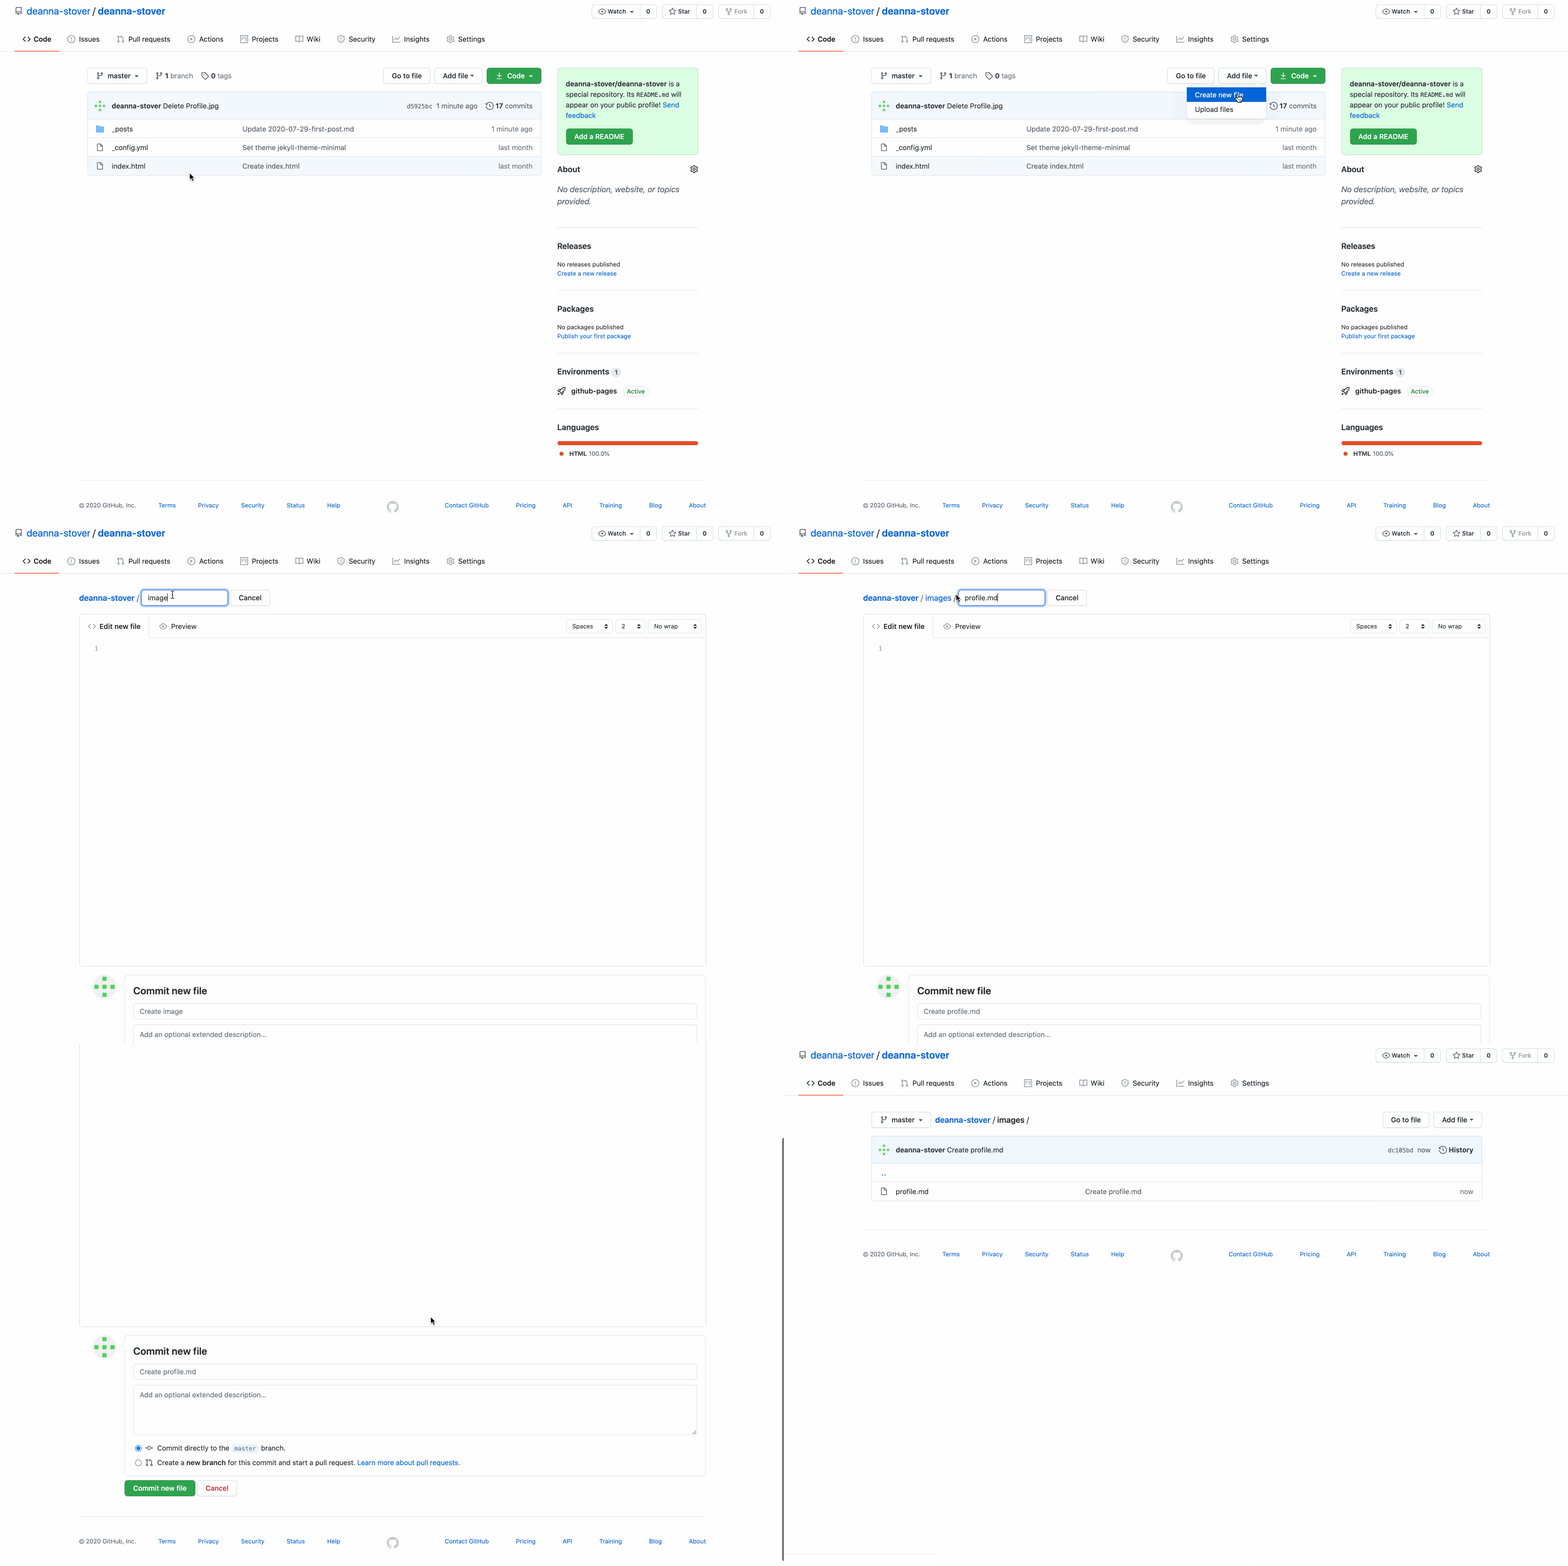
The first thing you need to do is create an images folder. You do this by going to Add File then Create New File. You will then type in images/profile.md (or whatever–the important part is the images/. You can delete the .md file later. It’s just there so that you have a folder.) Don’t forget to Commit your changes.

Step Two:
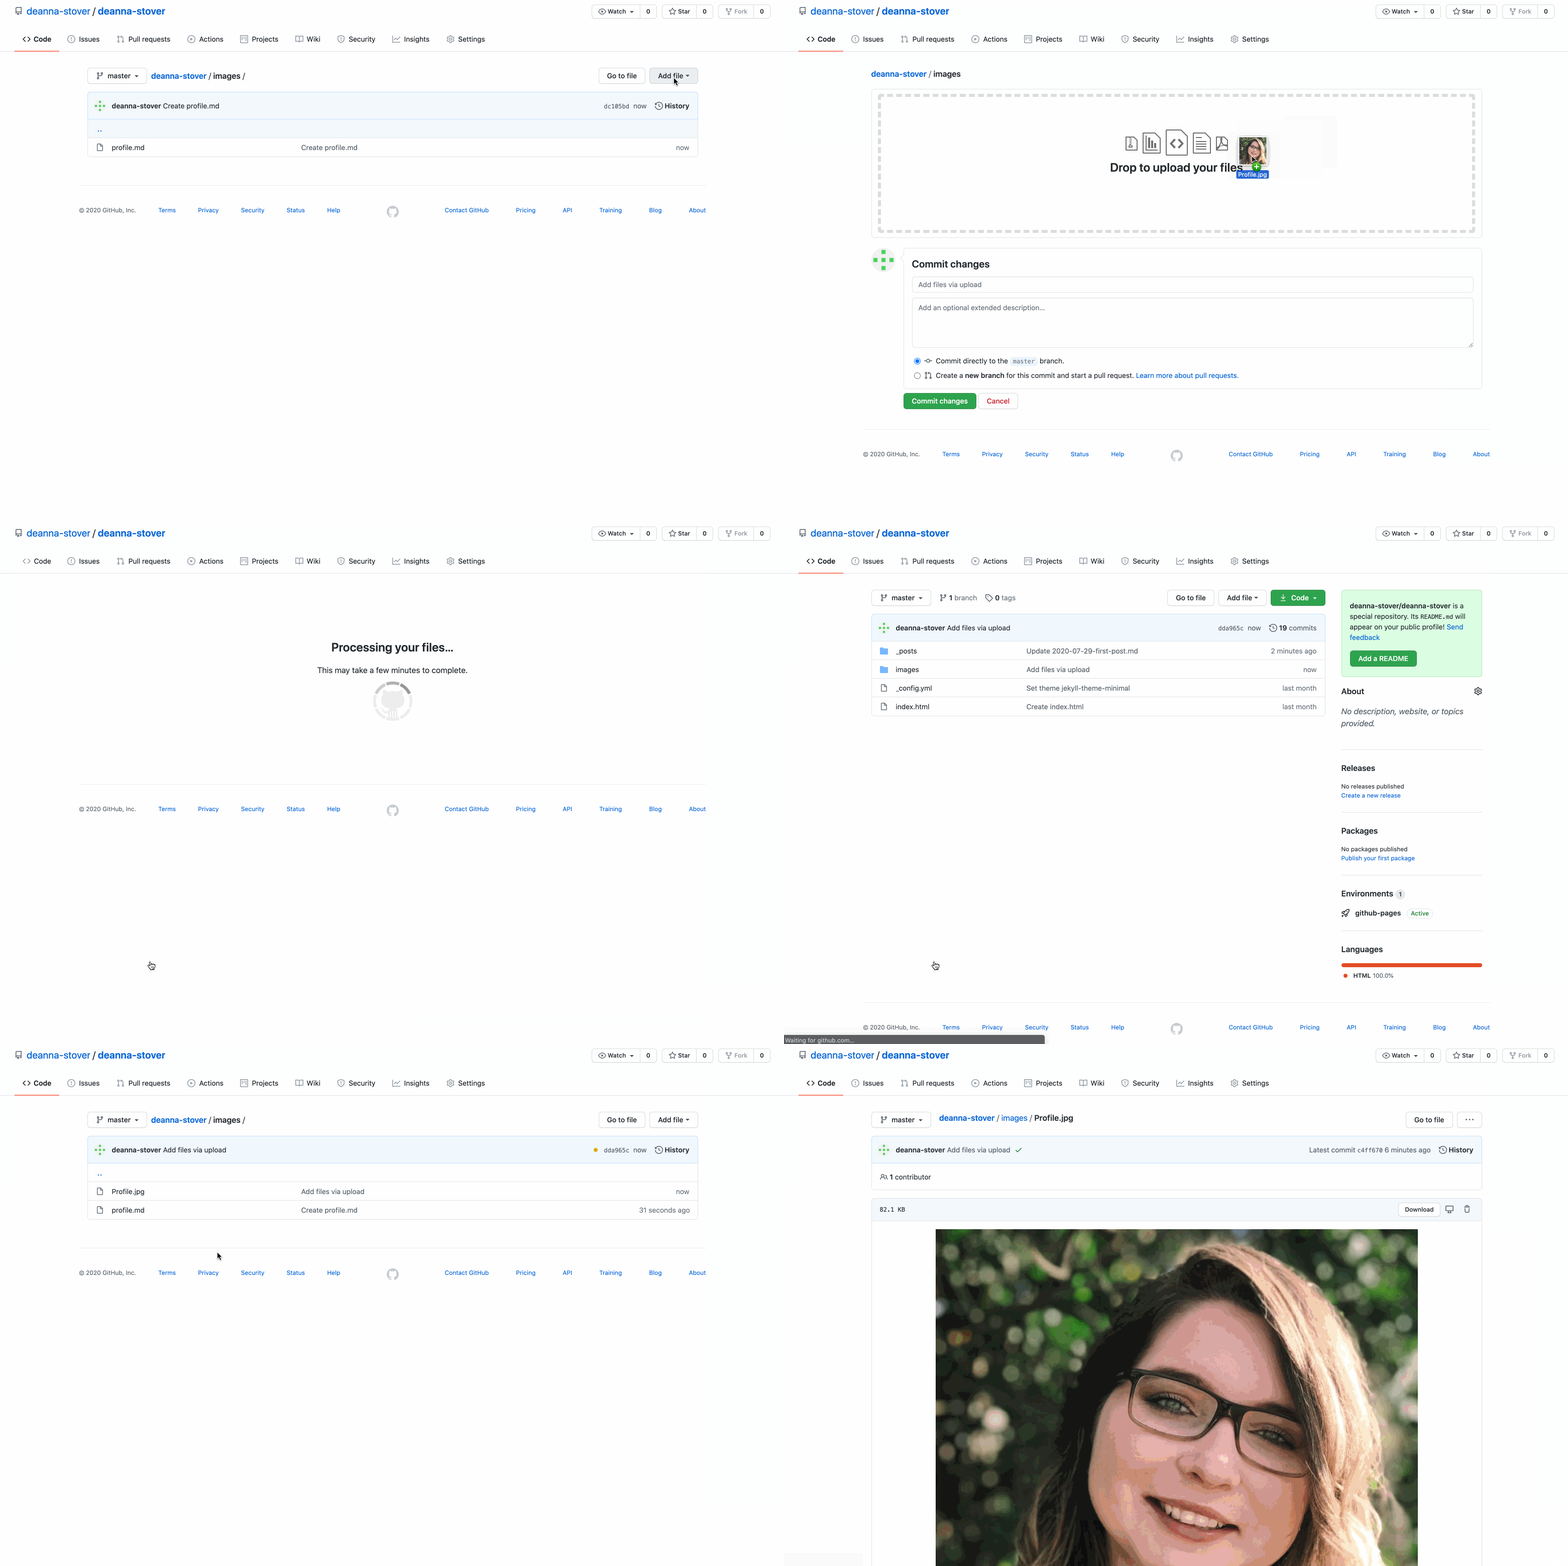
Once you’ve created the folder, make sure you’re in the images folder the click Add File then Upload Files. You can then drag and drop your picture into GitHub. Don’t forget to Commit.
Tips:
- You want to name your photo rather than leave it a string of letters or numbers. The title will be the link you use. I chose “Profile.jpg” because it is my profile picture.
- Make sure your image is smaller than my gigantic one, but good quality.

Step Three:
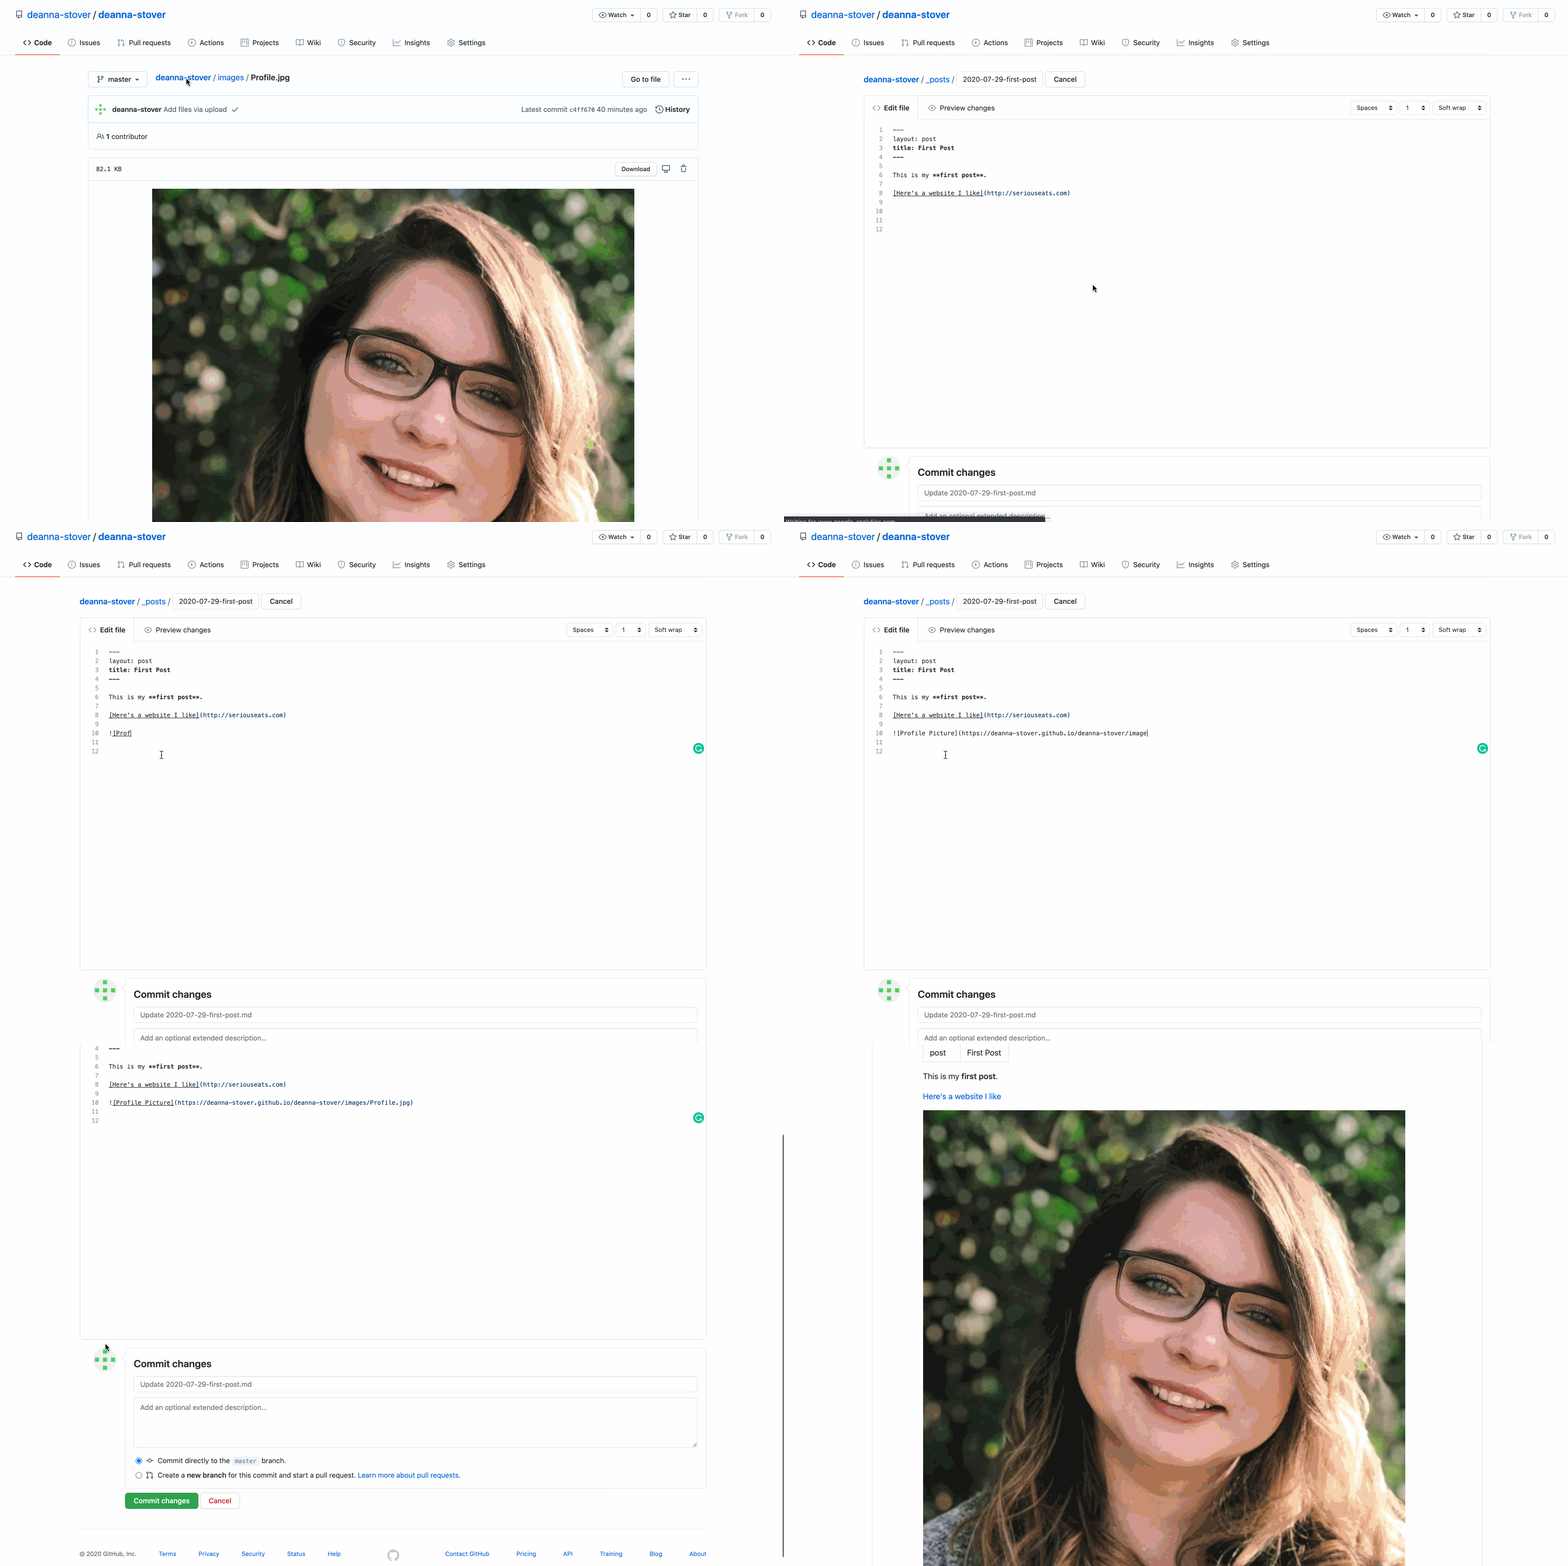
To add your image into your blog, first go to your _posts folder then to the appropriate post. Once you click the edit button (the pencil), you can type  (filling in the blanks as appropriate. Your link should be the path to the image. So username.github.io/repositoryname/images/imagetitle.filetype. Don’t forget to commit.

And remember, always check to see if the image is showing up on your actual blog, not just the preview in GitHub. If it’s not, you’re using the wrong link (tip: if your link has “blob” or “github.com” in it, you’re using the wrong link. Instead, you need to use the path that looks something like this: https://deanna-stover.github.io/deanna-stover/images/Profile.jpg).
Review
Based on the reviews you read in preparation, write a review of a digital project you found. Remember that you can be critical and still polite or appreciative but still evaluative. This blog should be 500-750 words.
Some general guidelines: you must find and review a digital humanities project, not just an article or book on DH. You might find a mapping project or a digital edition (note that this is different than an electronic text) or really anything you think qualifies as DH. If you’re having trouble finding something or telling whether what you’ve found qualifies as DH, bring your issue up in class (we have some time for that scheduled on Friday, September 18th) or visit me during Office Hours.
Once you’ve figured out the project you’d like to review, “claim” it in our Shared Google Drive. Do this by class on Friday, September 18th. Make sure to pick something that other people have not yet claimed.
Please do not review a project that has already been reviewed in Reviews in DH or mentioned in Miriam Posner’s “How Did They Make That?” Anything we look at in class is fair game, but make sure you “claim” it ASAP.
Include at least one image of the project you’re reviewing. But if your project is extra complex, remember, you may need more.
Make sure you use the following format for introducing your blog post:
Project:
Project Name
Project Director(s):
Project Director Name
Project URL:
Project URL
Tip: Check out the “Review Content” section from Reviews in DH to get some more ideas for what a review entails.
Coding
In this blog, you’ll write 500-750 words explaining the process of coding our text and reflecting on the final outcome. This can be about the difficulties you faced or something interesting you found in the reading. You’ll also explain any coding decisions you made.
Include at least two images, one of which shows your TEI on paper (what we did in the Google Doc!) and one of which shows your computer code (either the whole thing, or just a portion works since you’ll also be submitting your code to me). You may also want to include a (cropped!) screenshot of your tweets over the course of the project!
We’ll go over more tips in class on Monday, October 12th, but here are a few to get you started:
-
Be positive. You can be frustrated by parts of the project and discuss that, but remember, you always want to maintain positivity in your online persona. So, think critically about why you were frustrated and try to explain what frustrated you rather than going on a rant.
-
Use images well. Rather than putting them all at the bottom, think about placement.
-
Organize your writing. For instance, you may spend one paragraph introducing your part of the project, then one paragraph on the Google Doc excercise, then two paragraphs on actually using Oxygen, then you’ll conclude.
-
Explain questions you had while you were coding or decisions you had to make. Did you have errors in the text that you fixed? How and why? Was your coding experience pretty straight forward? Explain what made it so straight forward.
-
Did you notice new things about the reading by having to read it so closely? Or maybe her writing style? Try and find a way to blend this into your narrative!
-
Keep paragraphs relatively short for easy reading!
-
If you want to include code of any kind you need to use three ticks around the code. So three of these: `
-
Be professional. Even though this is a reflection, don’t get sidetracked by other topics. You can have fun while maintaining a professional persona–promise!
-
Continue trying to be more concise while varying sentence length.
Grant Process One
In this 500-750 word blog, share your project with the rest of the class (and update me!). You need to have at least one image in your blog post. This can be one of your tweets, a mock-up you’ve made, or a screen-shot of other projects that inspired you. Or all three!
A few questions to get you started:
- How has the research been going?
- Do you still imagine your project like you did when you first wrote your abstract?
- Have you found any other DH projects that are similar to yours? How are you differentiating your project from them?
You can borrow from your Environmental Scan and/or Grant Narrative for this post–but please do primarily write original text. Remember, this is in part a reflection, not just a description of your project. Definitely introduce your topic and your research, but also think about what has changed (if anything) since you began, what you still need to do to improve as your revise and draft your documents, and what has been easy or hard about this project.
Keep in mind the following:
-
Keep paragraphs relatively short for easy reading!
-
Be professional.
-
Continue trying to be more concise while varying sentence length.
-
Organize your writing. You may want to introduce your project, discuss some other projects that are similar, then reflect on the experience of writing the grant. Note that this formula isn’t written in stone–it’s just one way to go about writing your post!
Grant Process Two
Now that you’re nearing the end of your grant project, write a 500-750 word blog post that explains your nearly-finalized project. You need to have at least one image in your blog post. This can be one of your tweets, a mock-up you’ve made, or a screen-shot of other projects that inspired you. Or all three!
A few questions to get you started:
- Has anything changed since your last process post?
- If not, what have your developed further?
- How has the process of writing a grant changed your understanding of the project as a whole?
How to Submit
To find the URL for your blog, you’ll need to go to Settings on GitHub, scroll down to “GitHub Pages”, click the link, and then find your post. Once you’ve done that, simply copy and paste what is in the browser bar.
Your URL should start with something like this: https://deanna-stover.github.io/ NOT like this: https://github.com/deanna-stover/
Under “Assignments” on Scholar, please use the Text Submission “Write Submission” button to enter the URL to your blog and then upload a screenshot of your code. You may need to choose the “soft wrap” option in order to see all of the text at once. This option is in the upper left hand corner of where you edit your file.
Peer Review: If you have a peer review assignment with any blog post, please upload the feedback you received along with your code. While there is no grade for peer review per se, I will take into account whether you participated in peer review when calculating your grade for the assignment.
Late Work
About Me: Because I added the late policy after this due date, I will accept the About Me blog post with no penalty up to Wednesday, September 16th. Then I will start subtracting 10 points for every day your assignment is late.
The Rest: I will be subtracting 10 points for every day your assignment is late unless you’ve been been given an extension.
(General) Evaluation Criteria
-
Thinks critically whether you’re writing a review or a process post or just introducing yourself
-
Shows professionalism – i.e. that you took this assignment seriously
-
Presents information in an organized and coherent way
-
Follows instructions for the appropriate blog post
-
Utilizes proper mechanics; style, sentence structure, and spelling promote coherence, clarity, and credibility